Viking RDDFF236SS Side Trim Kit - Installation Instructions - Page 3
Required Components
 |
View all Viking RDDFF236SS manuals
Add to My Manuals
Save this manual to your list of manuals |
Page 3 highlights
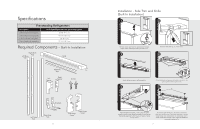
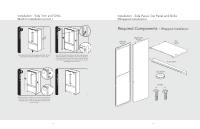
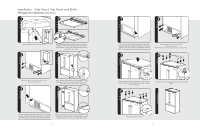
Installation - Side Trim and Grille (Built-In Installation) (cont.) 7 8 (71387-3.3/c4m") 2 1 2 Raise the unit up until the measurement from the floor to the top of the grille assembly is 73-3/4 inches. Shim trim has adhesive backing on both sides. Remove adhesive backing on refrigerator side only. Fit the shim trim to the front of the unit first. With center hinge, the shim trim will have a cutout. Use the cutout to locate the height of the shim trim. 9 1 2 2 complete Remove adhesive backing for the side trim. Locate the top of the side trim with the top of the grille assembly. Press the side trim into the refrigerator cabinet at the center location. 4 Installation - Side Panel, Top Panel and Grille (Wrapped Installation) Required Components - Wrapped Installation Left Side Panel Right Side Panel Top Panel Front Grille Cap Cover Screws A B 5
-
 1
1 -
 2
2 -
 3
3 -
 4
4
 |
 |
