Viking RDDFF236SS Side Trim Kit - Installation Instructions - Page 4
Installation - Side Panel, Top Panel and Grille, Wrapped Installation cont.
 |
View all Viking RDDFF236SS manuals
Add to My Manuals
Save this manual to your list of manuals |
Page 4 highlights
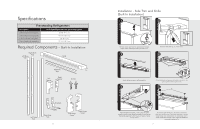
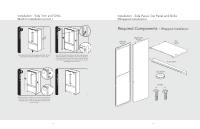
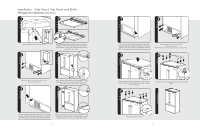
Installation - Side Panel, Top Panel and Grille (Wrapped Installation) (cont.) 1 2 Remove edge and top of corner cover. 3 B With top panel and grille upside down, position grille assembly in front of top panel. Secure top panel to grille assembly via four outer holes (B screws) and use existing for inner holes. 4 1 2 Remove screws on lower back machine cover. Hold for replacement. 5 Remove adhesive backing from the side panel. Fit the side panel to the front of the unit first. With a center hinge, the side panel will have a cutout. 6 2 1 2 Pull the machine cover off and slip back of side panel between refrigerator cabinet and machine cover. Install machine cover screws back into refrigerator cabinet. NOTE: The holes on the side panel are clearance holes. Remove adhesive backing from other side panel. Fit the side panel to the front of the unit first. Spacer on top of side panel needs to sit on top of refrigerator cabinet. 6 7 8 Pull the machine cover and slip back of side panel between refrigerator cabinet and machine cover. Install machine cover screws back into refrigerator cabinet. NOTE: The holes on the side panel are clearance holes. Install machine cover screws back into refrigerator cabinet. NOTE: The holes on the side panel are clearance holes. 9 10 A Align top panel and grille assembly to front door and position top panel and grille on top of unit. Flanges must fit into gap. 11 Insert six A screws through holes of top panel into side panel. complete Insert cap covers into holes. 7
-
 1
1 -
 2
2 -
 3
3 -
 4
4
 |
 |
