Viking VGIB151TNSS Use and Care Manual - Page 6
Before Lighting Your Trusear, Infrared Griller, Ventilation For Built-in Installations
 |
View all Viking VGIB151TNSS manuals
Add to My Manuals
Save this manual to your list of manuals |
Page 6 highlights
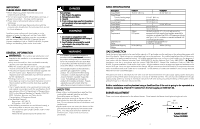
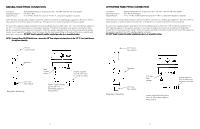
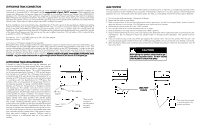
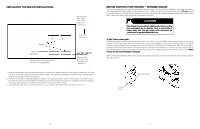
VENTILATION FOR BUILT-IN INSTALLATIONS Not less than 5.00 inches from inside bottom of countertop. Vents 5.00 inch maximum No more than 5.00 inches above the floor of the installation. 5.00 inch maximum 1.00 inch maximum Not less than 1.00 inch from inside floor of installation. 1. At least one ventilation opening shall be provided on the exposed exterior side of the enclosure located within 5 inches (127 mm) of the top of the enclosure and unobstructed. The opening(s) shall have a total free area of not less than 1 in2/lb (14.2 cm2/kg) of stored fuel capacity. 2. At least one ventilation opening shall be provided on the exposed, exterior side of the enclosure 1 inch (25.4 mm) or less from the floor level and shall have a total free area of not less than 1/2 in2/lb (7.1 cm2/kg) of stored fuel capacity. The upper edge shall be no more than 5 inches (127 mm) above the floor level. 3. Every opening shall have a minimum dimension so as to permit the entrance of a 1/8 inch (3.2 mm) rod. BEFORE LIGHTING YOUR TRUSEAR™ INFRARED GRILLER Prior to turning the gas on, inspect the gas supply tubing or hose. Look for evidence of abrasion, cuts, wear and tear, or other damage which could require replacement prior to use. Make sure all burner control knobs are off. Do not attempt to light the burner if the smell of gas is present. Check the connection with a soap and water solution after attaching the hose. Make sure there is gas in the tank and the tank is upright. CAUTION Wait at least 5 minutes before relighting a hot burner to allow any accumulated gas to dissipate. Keep a spray bottle of soapy water near the gas supply valve and check the connections for gas leaks before each use. To light TruSear infrared griller: Before lighting the burner, remove the stainless steel cover. Push in, turn the TruSear infrared control knob until the High position on the knob aligns with the indicator line on the control panel and continue to hold the knob in. Press the electronic ignition button which corresponds to the control knob. You will hear a clicking sound. After the burner lights, hold the control knob in for about 5 seconds longer or until the burner remains lit. Once lit, turn the control knob to the desired setting. If the burner does not light within 4 seconds, release and turn the control knob to "off". Wait 5 minutes for any accumulated gas to dissipate. After several failed attempts the burner can be lit by holding a lit match to the burner with the control knob turned to the light position. Control Knob Electronic Ignitor 10 11
-
 1
1 -
 2
2 -
 3
3 -
 4
4 -
 5
5 -
 6
6 -
 7
7 -
 8
8
 |
 |
