Viking VGIB151TNSS Use and Care Manual - Page 7
CLEANING AND MAINTENANCE, REPLACEMENT PARTS, TruSear Infrared Cooking Chart
 |
View all Viking VGIB151TNSS manuals
Add to My Manuals
Save this manual to your list of manuals |
Page 7 highlights
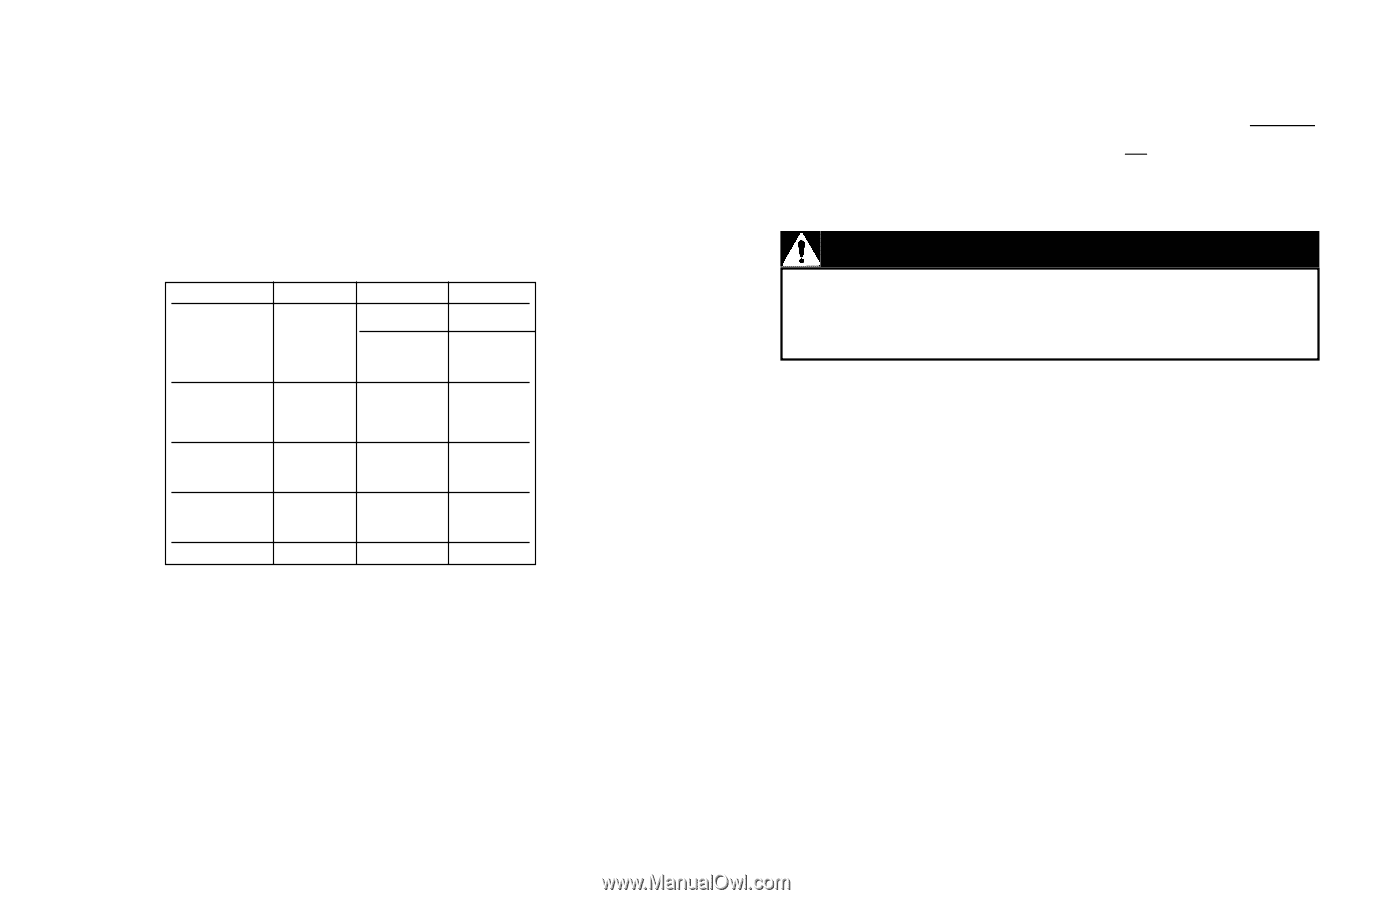
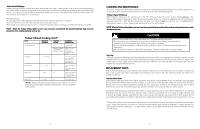
TruSear Infrared Grilling tips Infrared grilling produces intense heat which quickly sears the meat. Searing locks in flavor and juices while allowing the outer surface to absorb smoke and food aroma that is produced as grease and drippings are vaporized by the burner. The result is a crisp, flavorful outside with a tender, juicy inside. As a general rule, foods will cook in about 1/2 the time they would take on an ordinary grill. •Preheat the grill. •Ensure that meat is fully thawed and that all excess fat is trimmed away prior to grilling. •Leave the burner set on "HI" when placing food on the grill to sear. •For thicker cuts of meats, adjust burner to a lower setting and continue cooking until desired doneness is reached. NOTE: When the TruSear infrared griller is not in use, it must be covered with the provided stainless steel cover for protection from outside elements such as rain. TruSear Infrared Cooking Chart* FOOD WEIGHT OR THICKNESS CONTROL SETTING SUGGESTED COOKING TIME Chicken Breast, Bnls HI Reduce to medium setting halfway between Hi and LO 2 - 3 mins each side. Cook 8 - 10 mins. total. Turn occasionally to prevent burning outside. Hamburger 1/2 - 3/4" thick HI 2 mins each side to sear. Cook 6 - 8 mins. total. Turn occasionally to prevent burning. Steaks, Ribeye 1 1/2 " thick HI 3 mins each side for Rare. 4 mins each side for medium. Steaks, Filet 1" thick HI 3 mins each side for rare to med. rare 3 1/2 mins each side for medium Pork Chops 3/4" thick HI 4 mins each side *NOTE: These times are recommendations only. Variations in cuts of meats and personal taste may alter cooking times. Use your discretion when grilling. CLEANING AND MAINTENANCE Any piece of equipment works better and lasts longer when maintained properly and kept clean. Grilling equipment is no exception. Your TruSear™ Infrared Burner must be kept clean and maintained properly. TruSear Infrared Grill Burner When finished cooking, turn the control knob to the "HI" setting and allow the burner to burn for Five Minutes. This helps to eliminate any drippings or debris that would otherwise remain on the burner, degrading the performance and reducing burner life. After the five minute burn-off time, turn the grill OFF and allow to cool completely before attempting to clean or move. Wipe excess grease and food from grill surfaces. NOTE: When the TruSear infrared griller is not use, it must be covered with the provided stainless steel cover for protection from outside elements such as rain. CAUTION •Do not use a metal knife or any other metal tool to scrape stainless steel parts. •Do not permit citrus or tomato juice to remain on stainless steel surfaces, as citric acid will permanently discolor stainless steel. Wipe up any spills immediately. •Do not use abrasive cleaners, steel wool pads, or abrasive cloths on stainless steel, painted parts or brass parts. •Do not use brass cleaners on the brass option parts. They are coated with an epoxy coating. Drip Tray The drip tray pans should be removed and cleaned after each use. Allow the drippings in the the drip tray pans to cool completely before removing. To remove the drip tray pans, simply remove the pans from the tray. Place the trays in hot, soapy water to clean. Wipe up any debris that may have collected in the drip tray with a hot, soapy towel. Dry and replace drip tray pans before next use. REPLACEMENT PARTS Only authorized replacement parts may be used in performing service on the side burners. Do not repair or replace any part of the outdoor grill unless specifically recommended in the manual. All other servicing should be referred to a qualified technician. Stainless Steel* Parts Some stainless steel parts may have a plastic protective wrap which must be peeled off. Do not expose protective plastic film on the stainless steel to heat or direct sunlight. It could melt onto the stainless steel parts and become difficult to remove. The interior should be washed thoroughly with hot, soapy water to remove film residues and any dust or debris before being used, then rinsed and wiped dry. Solutions stronger than soap and water are rarely needed. All stainless steel body parts should be wiped with hot, soapy water and with a liquid cleaner designed for this material. If buildup occurs, do not use steel wool, abrasive cloths, cleansers, or powders! If it is necessary to scrape stainless steel to remove encrusted materials, soak with hot, wet cloths to loosen the material, then use a wool or nylon scraper. Do not use a metal knife, spatula, or any other material tool to scrape stainless steel! Scratches are almost impossible to remove. *Under rare conditions, such as an extremely salty environment, small amounts of rust may accumulate on stainless steel parts. These small amounts of surface rust can easily be removed by applying Soft Scrub® Gel to a damp sponge and wiping with the stainless steel grain. It is important to make sure you wipe with the grain for the most efficient removal of surface rust. 12 13
-
 1
1 -
 2
2 -
 3
3 -
 4
4 -
 5
5 -
 6
6 -
 7
7 -
 8
8
 |
 |