Vivitar F128 User Manual - Page 6
Powering the Camera
 |
View all Vivitar F128 manuals
Add to My Manuals
Save this manual to your list of manuals |
Page 6 highlights
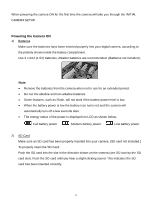
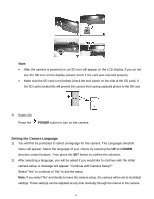
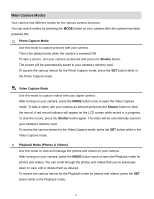
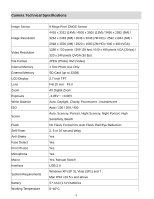
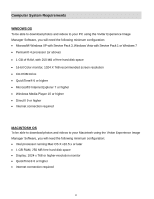
When powering the camera ON for the first time the camera will take you through the INITIAL CAMERA SETUP. Powering the Camera ON 1) Batteries Make sure the batteries have been inserted properly into your digital camera, according to the polarity shown inside the battery compartment. Use 3 x AAA (1.5V) batteries. Alkaline batteries are recommended. (Batteries not included.) Note: Remove the batteries from the camera when not in use for an extended period. Do not mix alkaline and non-alkaline batteries. Some features, such as Flash, will not work if the battery power level is low. When the battery power is low the battery icon turns red and the camera will automatically turn off a few seconds later. The energy status of the power is displayed on LCD as shown below: Full battery power Medium battery power Low battery power 2) SD Card Make sure an SD card has been properly inserted into your camera. (SD card not included.) To properly insert the SD Card: Push the SD card into the slot in the direction shown on the camera (see SD icon by the SD card slot). Push the SD card until you hear a slight clicking sound. This indicates the SD card has been inserted correctly. 5
-
 1
1 -
 2
2 -
 3
3 -
 4
4 -
 5
5 -
 6
6 -
 7
7 -
 8
8 -
 9
9 -
 10
10 -
 11
11 -
 12
12 -
13
-
14
-
15
-
16
-
17
-
18
-
19
-
20
-
21
-
22
-
23
-
24
-
25
-
26
-
27
-
28
-
29
-
30
-
31
-
32
-
33
-
34
-
35
-
36
-
37
-
38
-
39
-
40
-
41
-
42
-
43
-
44
-
45
-
46
-
47
-
48
-
49
-
50
-
51
-
52
-
53
-
54
-
55
-
56
-
57
-
58
-
59
-
60
-
61
-
62
-
63
-
64
-
65
-
66
 |
 |
