Vizio E320VT E320VT User Manual - Page 19
Changing the Input Source
 |
View all Vizio E320VT manuals
Add to My Manuals
Save this manual to your list of manuals |
Page 19 highlights
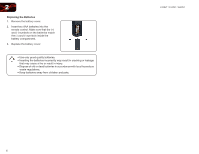
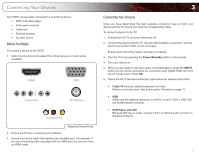
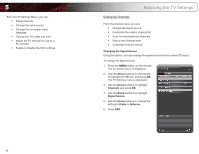
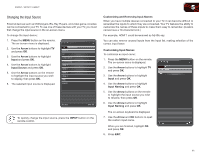
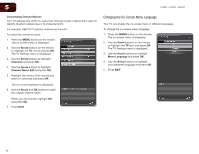
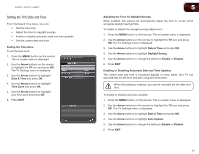
E320VT / E370VT / E420VT 5 Changing the Input Source External devices such as DVD players, Blu-Ray Players, and video game consoles can be connected to your TV. To use one of these devices with your TV, you must first change the input source in the on-screen menu. To change the input device: 1. Press the MENU button on the remote. The on-screen menu is displayed. 2. Use the Arrow buttons to highlight TV and press OK. 3. Use the Arrow buttons to highlight Input and press OK. 4. Use the Arrow buttons to highlight Input Source and press OK. 5. Use the Arrow buttons on the remote to highlight the input source you wish to display, then press OK. 6. The selected input source is displayed. Input Source DTV/TV AV Component 1 Component 2 HDMI 1 HDMI 2 HDMI 3 HDMI 4 RGB PHOTO LAST EXIT To quickly change the input source, press the INPUT button on the remote control. Customizing and Removing Input Names When you have multiple devices connected to your TV, it can become difficult to remember the inputs to which they are connected. Your TV features the ability to customize the names of these inputs to make them easy to remember. (Custom names have a 10-character limit.) For example, HDMI 1 could be renamed as My Blu-ray. You can also remove unused inputs from the input list, making selection of the correct input faster. Customizing Input Names To customize an input name: 1. Press the MENU button on the remote. The on-screen menu is displayed. 2. Use the Arrow buttons to highlight TV and press OK. 3. Use the Arrow buttons to highlight Input and press OK. 4. Use the Arrow buttons to highlight Input Naming and press OK. 5. Use the Arrow buttons on the remote to highlight the input source you wish to rename, then press OK. 6. Use the Arrow buttons to highlight Input Naming and press OK. The on-screen keyboard is displayed. 7. Use the Arrow and OK buttons to spell the custom input name. When you are finished, highlight OK and press OK. 8. Press EXIT. 11
-
 1
1 -
2
-
3
-
4
-
5
-
6
-
7
-
8
-
9
-
10
-
11
-
12
-
13
-
 14
14 -
 15
15 -
 16
16 -
 17
17 -
 18
18 -
 19
19 -
 20
20 -
 21
21 -
 22
22 -
 23
23 -
 24
24 -
25
-
26
-
27
-
28
-
29
-
30
-
31
-
32
-
33
-
34
-
35
-
36
-
37
-
38
-
39
-
40
-
41
-
42
-
43
-
44
-
45
-
46
-
47
-
48
 |
 |