Vizio M55-C2 User Manual (English) - Page 24
Changing The Screen Aspect Ratio, Viewing Video With The Menu Open - calibration
 |
View all Vizio M55-C2 manuals
Add to My Manuals
Save this manual to your list of manuals |
Page 24 highlights
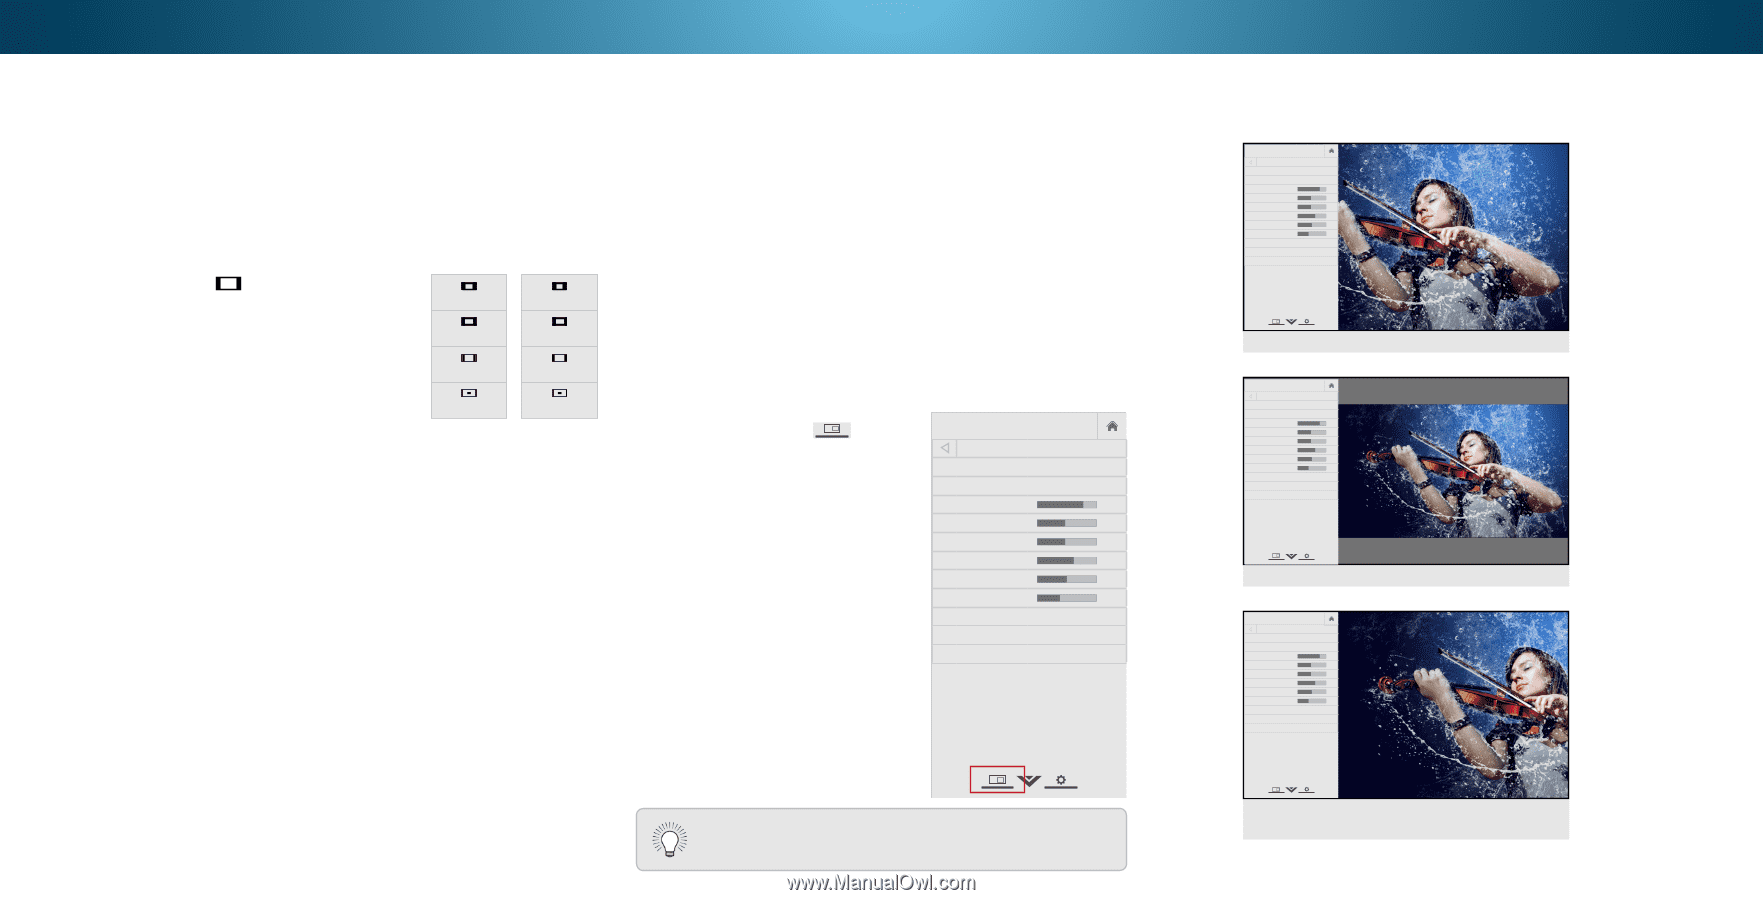
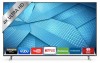
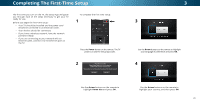
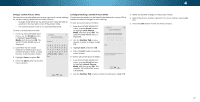
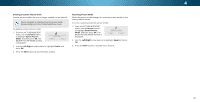
CHANGING THE SCREEN ASPECT RATIO The TV can display images in five different modes: Normal, Stretch, Panoramic, Wide, and Zoom. Each mode displays the picture differently. See Adjusting the Wide Mode (Aspect Ratio) on page 45 for an alternate way of adjusting the screen aspect ratio. To change the screen aspect ratio: 1. Press the button on the remote. 2. Use the Arrow buttons to highlight the aspect ratio you wish to view and press OK. Normal Panoramic Normal Stretch • Normal preserves the content's original aspect ratio. Since the 4:3 aspect ratio is not large enough to fill the TV's screen, black bars are added to the left and right of the display image. Wide Wide Zoom Zoom Note: Aspect ratio settings may vary by Input source. • Stretch expands the display image to fill the screen. Images may appear wider than intended. If you are watching widescreen (1.85:1 or 2.35:1) content, black bars will still appear on the top and bottom of the display image. This option is only available when the TV is displaying a 720p/1080i/1080p source. • Panoramic expands the display image to fill the screen. Images may appear wider than intended. If you are watching widescreen (1.85:1 or 2.35:1) content, black bars will still appear on the top and bottom of the display image. This option is only available when the TV is displaying a 480i/480p source. • Wide stretches a 4:3 aspect ratio picture to the edges of the screen. Since the picture is being stretched, the display image may appear distorted. If the program is already formatted for widescreen viewing (1.85:1 or 2.35:1), then black bars will appear on the top and bottom of the display image. • Zoom expands images with black bars to fit the screen. VIZIO Wide Zoom Normal Panoramic VIEWING VIDEO WITH THE MENU OPEN When the on-screen menu opens, it covers the left-hand portion of the picture. The picture can be displayed in three difEfxeit rent 2wDays: 3D • Full-sized and centered on the screen (Overlay) - The left-hand portion of the picture covered by the menu. ABC • Resized to fit (Viewport) - The entire picture is visible in the space to the right of the menu. Input Wide CC • Full-sized and aligned to the right edge of the menu (Centered Overlay) - The picture extends off of the right side of the screen. Sleep Timer Picture Audio To change the position of the picture while the on-screen menu is displayed: 1. Use the Arrow buttons on the remote to highlight Resize Video. 2. Press OK to cycle through the three display methods. 3. Press the Up Arrow button on the remote to the menu. 4. See Changing the View Mode Settings on page 45 for an alternate method of adjusting the video. VIZIO Network Settings Help PICTURE Picture Mode Standard Auto Brightness Control Backlight - Brightness - Contrast - Color - Tint - Sharpness - Medium + 85 + 50 + 50 + 59 +0 +9 More Picture Picture Mode EDIT Color Calibration VIZIO PICTURE Picture Mode Standard Auto Brightness Control Backlight - Brightness - Contrast - Color - Tint - Sharpness - Off + 85 + 50 + 50 + 59 +0 +9 More Picture Picture Mode Edit Color Calibration Wide Zoom Normal Panoramic Exit 2D 3D ABC Input Wide CC Sleep Timer Picture Audio Network Settings Help FULL-SIZED AND CENTERED (OVERLAY) Wide Exit VIZIO PICTURE Picture Mode Standard Wide Auto Brightness Control Backlight - Brightness - Contrast - Color - Tint - ZoomSharpness Norm- al Off + 85 + 50 + 50 Exit + 59 +0 + Pa9 noramic More Picture Picture Mode Edit Input Color Calibration Zoom 2D Wide Normal 3D ABC CC Panoramic Sleep Timer Picture Audio 2D 3D Network Settings Help ABRCESIZED TO FIT (VIEWPORT) Input Sleep Timer WidVeIZIO PICTURE CC Picture Mode Standard Auto Brightness Control Backlight - Brightness - Contrast - Color - P i c t u re Tint Sharpness Au--dio Off + 85 + 50 + 50 + 59 +0 +9 More Picture Picture Mode Edit Color Calibration Wide Zoom Normal Panoramic Exit 2D 3D ABC Input Wide CC Sleep Timer Picture Audio Network Settings Help Network Settings Help Tip: The aspect ratio cannot be changed for Ultra HD content or for any video content on HDMI-5. FULL-SIZED AND ALIGNED TO RIGHT OF MENU (CENTERED OVERLAY) 4 24
-
 1
1 -
2
-
3
-
4
-
5
-
6
-
7
-
8
-
9
-
10
-
11
-
12
-
13
-
14
-
15
-
16
-
17
-
18
-
 19
19 -
 20
20 -
 21
21 -
 22
22 -
 23
23 -
 24
24 -
 25
25 -
 26
26 -
 27
27 -
 28
28 -
 29
29 -
30
-
31
-
32
-
33
-
34
-
35
-
36
-
37
-
38
-
39
-
40
-
41
-
42
-
43
-
44
-
45
-
46
-
47
-
48
-
49
-
50
-
51
-
52
-
53
-
54
-
55
-
56
-
57
-
58
-
59
-
60
-
61
-
62
-
63
-
64
-
65
-
66
-
67
-
68
 |
 |