Vizio VBR200W VBR200W User Manual - Page 9
Rear Panel Connections - wireless
 |
View all Vizio VBR200W manuals
Add to My Manuals
Save this manual to your list of manuals |
Page 9 highlights
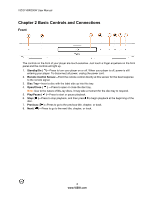
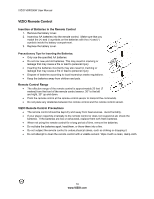
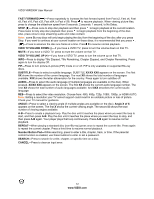
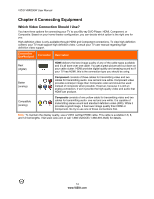
Rear Panel Connections VIZIO VBR200W User Manual 1. VIDEO OUT-Connect a standard AV TV. For composite TVs, you will also need to connect the red and white audio jacks (see #6 below) to the Analog L/R Audio Out jacks. 2. L/R AUDIO OUT-Connect the audio for the TV you connected to the VIDEO OUT or COMPONENT jack to these audio jacks. You can connect the audio for a component TV to a sound system instead of to the TV. 3. COAXIAL DIGITAL AUDIO OUT- If you are not using an HDMI-capable audio receiver, connect to a sound system that has a coaxial audio jack. 4. USB-Connect a USB flash drive to view multimedia content such as pictures and music or to view BD-LiveTM Content. 5. POWER-Connect this cord into a power outlet. 6. COMPONENT (Y/CbPb/CrPr) -Connect a component video device, such as a TV. For component TVs, you will also need to connect the red and white audio jacks (see #2 above) to the Analog L/R Audio Out jacks. Component video is limited to 1080i. 7. HDMI-Connect a digital video and audio device, such as TV, to this all digital connector. No additional audio connection is needed. Only HDMI is capable of delivering 1080p video and the highest quality Dolby and DTS soundtracks. 8. ETHERNET-Connect an Ethernet cable (not included) to access services such as Netflix streaming, BD-Live, and software updates. Your player also has 802.11n wireless, so you can connect your player to the Internet through your wireless home network instead of using this connector. See Connecting to your home network on page 18 for detailed information on setting up your Internet connection. 9. OPTICAL DIGITAL AUDIO OUT-If you are not using an HDMI-capable audio receiver, connect to a sound system that has an optical audio jack. 10. WIFI ANTENNA-Sends and receives signals from your wireless home network. See Connecting to your home network on page 18 for detailed information on setting up your Internet connection. The LEDs will blink: Orange indicates the antenna is working. Blue indicates that data is transferring. Version 3/30/2010 9 www.VIZIO.com
-
 1
1 -
2
-
3
-
 4
4 -
 5
5 -
 6
6 -
 7
7 -
 8
8 -
 9
9 -
 10
10 -
 11
11 -
 12
12 -
 13
13 -
 14
14 -
15
-
16
-
17
-
18
-
19
-
20
-
21
-
22
-
23
-
24
-
25
-
26
-
27
-
28
-
29
-
30
-
31
-
32
-
33
-
34
-
35
-
36
-
37
-
38
-
39
-
40
-
41
-
42
-
43
-
44
-
45
-
46
-
47
-
48
-
49
-
50
-
51
-
52
-
53
 |
 |
