Vtech CL82209 User Manual - Page 10
Telephone base & charger installation
 |
View all Vtech CL82209 manuals
Add to My Manuals
Save this manual to your list of manuals |
Page 10 highlights
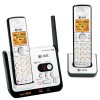
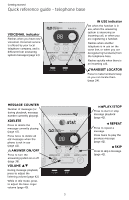
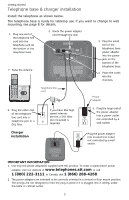
Getting started Telephone base & charger installation Install the telephone as shown below. The telephone base is ready for tabletop use. If you want to change to wall mounting, see page 8 for details. 1. Plug one end of the telephone line cord into the telephone jack on the bottom of the telephone base. 2. Route the power adapter cord through the slot. 7. Raise the antenna. 3. Plug the small end of the telephone base power adapter into the power jack on the bottom of the telephone base. 4. Place the cords into the channels. Telephone line cord Power adapter 6. Plug the other end of the telephone line cord into a telephone jack or a DSL filter. Charger installation If you have DSL high speed Internet service, a DSL filter (not included) is required. 5. Plug the large end of the power adapter into a power outlet not controlled by a wall switch. Plug the power adapter into an electrical outlet not controlled by a wall switch. IMPORTANT INFORMATION 1. Use only the power adapter(s) supplied with this product. To order a replacement power adapter, visit our website at www.telephones.att.com, or call 1 (800) 222-3111. In Canada, dial 1 (866) 288-4268. 2. The power adapters are intended to be correctly oriented in a vertical or floor mount position. The prongs are not designed to hold the plug in place if it is plugged into a ceiling, underthe-table or cabinet outlet. 5
-
 1
1 -
2
-
3
-
4
-
 5
5 -
 6
6 -
 7
7 -
 8
8 -
 9
9 -
 10
10 -
 11
11 -
 12
12 -
 13
13 -
 14
14 -
 15
15 -
16
-
17
-
18
-
19
-
20
-
21
-
22
-
23
-
24
-
25
-
26
-
27
-
28
-
29
-
30
-
31
-
32
-
33
-
34
-
35
-
36
-
37
-
38
-
39
-
40
-
41
-
42
-
43
-
44
-
45
-
46
-
47
-
48
-
49
-
50
-
51
-
52
-
53
-
54
-
55
-
56
-
57
-
58
-
59
-
60
-
61
-
62
-
63
-
64
-
65
-
66
-
67
-
68
-
69
-
70
-
71
-
72
-
73
-
74
-
75
-
76
-
77
 |
 |
