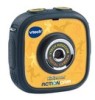
Vtech Kidizoom Action Cam Yellow/Black User Manual - Page 18
Settings
 |
View all Vtech Kidizoom Action Cam Yellow/Black manuals
Add to My Manuals
Save this manual to your list of manuals |
Page 18 highlights
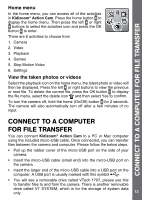
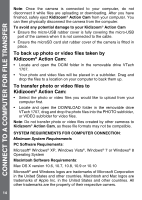
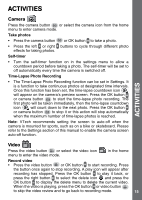
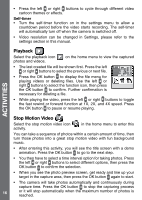
Settings Select the settings icon in the home menu to enter Settings. In Settings, press the left or right buttons to select an item first, then press the OK button to adjust the settings. Once adjusted, press the OK button to save the adjusted settings. Then press the home button to exit. You can adjust the following items: (A) Volume Press the left or right buttons to increase or decrease the volume, then press the OK button to confirm. (B) Brightness Press the left or right buttons to increase or decrease the brightness, then press the OK button to confirm. (C) Time-Lapse Recording SETTINGS Press the left or right buttons to select a time interval between photos automatically taken in camera mode, then press the OK button to confirm. (D) Camera Screen Auto-Off Press the left or right buttons to turn this function on or off and then press the OK button to confirm. If it is turned on, the screen will automatically turn off after a certain amount of time in camera or video mode. Note: For safety, VTech highly recommends setting the screen to auto off when the camera is mounted for sports, such as on a bike or skateboard. (E) Self-timer Press the left or right buttons to turn it on or off, then press the OK button to confirm. When self-timer is set to on, there will be a countdown before the photo or video is taken. Note: the self-timer will be turned off automatically every time the camera is switched off. (F) Date The left and right icons will appear on the item to adjust, press the left or right buttons to change the value and press the OK button to confirm. Press the left or right buttons again to move to adjust other items and press the OK button to start adjusting it. Move to the OK icon and press the OK button when you have 18 finished.
-
 1
1 -
2
-
3
-
4
-
5
-
6
-
7
-
8
-
9
-
10
-
11
-
12
-
 13
13 -
 14
14 -
 15
15 -
 16
16 -
 17
17 -
 18
18 -
 19
19 -
 20
20 -
 21
21 -
 22
22 -
 23
23 -
24
-
25
-
26
-
27
-
28
-
29
-
30
-
31
-
32
-
33
-
34
-
35
-
36
-
37
-
38
-
39
 |
 |
