Weber Platinum II 2200 LP Owner Manual - Page 16
Side Burner Maintenance
 |
View all Weber Platinum II 2200 LP manuals
Add to My Manuals
Save this manual to your list of manuals |
Page 16 highlights
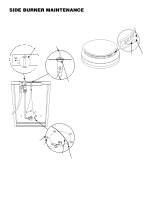
SIDE BURNER MAINTENANCE WARNING: All gas controls and supply valves should be in the OFF position. Figure 17 (a). Make sure black wire is connected between igniter and electrode. Make sure white wire is connected between igniter and ground. Check that igniter lock nut is tight. Figure 17 (b) and figure 17 (c). Note - If the igniter works loose, carefully tighten the igniter lock nut with an adjustable wrench or pliers. (a) burner control Igniter button knob The Platinum Series II side burner has been factory set for the correct air and gas mixture. The correct flame pattern is shown in Figure 18. Tips occasionally yellowish (b) Dark Light blue blue Igniter lock nut Figure 18 Views of figures 17 (b) and (c) from under side burner Figure 17 (c) white wire Ground black wire electrode 16
-
 1
1 -
2
-
3
-
4
-
5
-
6
-
7
-
8
-
9
-
10
-
 11
11 -
 12
12 -
 13
13 -
 14
14 -
 15
15 -
 16
16 -
 17
17 -
 18
18 -
 19
19 -
 20
20 -
 21
21 -
22
-
23
-
24
 |
 |
