Weider 1120 English Manual - Page 9
Arm Assembly
 |
View all Weider 1120 manuals
Add to My Manuals
Save this manual to your list of manuals |
Page 9 highlights
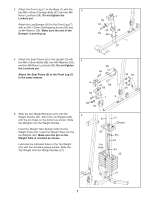
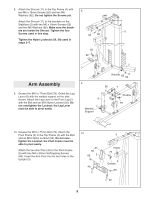
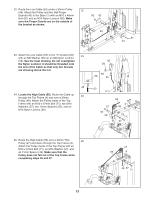
8. Attach the Shroud (17) to the Top Frame (4) with two M6 x 16mm Screws (62) and two M6 Washers (82). Do not tighten the Screws yet. Attach the Shroud (17) to the brackets on the Stabilizer (2) with two M6 x 16mm Screws (62) and two M6 Washers (82). Make sure the brackets are inside the Shroud. Tighten the four Screws used in this step. Tighten the Nylon Locknuts (56, 58) used in steps 2-7. 8 62 82 62 82 4 17 2 Arm Assembly 9. Grease the M10 x 77mm Bolt (79). Orient the Leg Lever (8) with the welded support on the side shown. Attach the Leg Lever to the Front Leg (7) with the Bolt and an M10 Nylon Locknut (56). Do not overtighten the Locknut; the Leg Lever must be able to pivot easily. Bracket 82 62 9 56 7 8 Welded Support Grease 79 10. Grease the M10 x 77mm Bolt (79). Attach the Pivot Frame (5) to the Top Frame (4) with the Bolt and an M10 Nylon Locknut (56). Do not overtighten the Locknut; the Pivot Frame must be able to pivot easily. Attach the two Arm Pins (40) to the Pivot Frame (5) with two M4 x 20mm Self-tapping Screws (69). Insert the Arm Pins into the two holes in the Upright (3). 10 56 69 5 40 9 4 Holes 79 3 Grease 69 40
-
 1
1 -
2
-
3
-
 4
4 -
 5
5 -
 6
6 -
 7
7 -
 8
8 -
 9
9 -
 10
10 -
 11
11 -
 12
12 -
 13
13 -
 14
14 -
15
-
16
-
17
-
18
-
19
-
20
-
21
-
22
-
23
-
24
-
25
-
26
-
27
-
28
 |
 |
