Weider 8630 Training Canadian English Manual - Page 13
Attach the Rear Cable 87 to a Small U-bracket
 |
View all Weider 8630 Training manuals
Add to My Manuals
Save this manual to your list of manuals |
Page 13 highlights
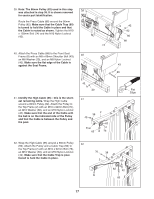
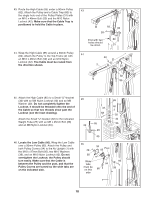
24. Identify the Rear Cable (87)-this is the short- 24 est Cable. Remove the M8 x 69mm Shoulder Bolt (43) from the Top Frame (2). Loosen the indi- cated M8 Nylon Locknut (40). Attach the Rear Cable to the Top Frame with the M8 x 69mm Shoulder Bolt (43) and an M8 Nylon Locknut (40). Make sure the flat edge of the Cable is against the Top Frame. 43 2 87 Loosen-40 Retighten the indicated M8 Nylon Locknut (40). 25. See the inset drawing. Wrap the Rear Cable (87) under a 90mm Pulley (82). Attach the Pulley and a Cable Trap (80) to the upper hole in a Large "U"-bracket (84) with an M10 x 48mm Bolt (50) and an M10 Nylon Locknut (42). Make sure that the Cable is in the groove of the Pulley and that the Cable and Pulley move smoothly. Flat Edge 25 87 80 82 42 50 84 26. Wrap the Rear Cable (87) around a 90mm Pulley (82). Attach the Pulley to the Top Frame (2) with 26 an M10 x 48mm Bolt (50) and an M10 Nylon Locknut (42). The Cable must be routed from the direction shown. 2 42 40 50 82 87 27. Attach the Rear Cable (87) to a Small "U"-bracket (32) with an M8 Nylon Locknut (40) and an M8 27 Washer (20). Do not completely tighten the 32 Locknut; it should be threaded onto the end of the Cable so that two threads show past 68 the Locknut (see the inset drawing). Attach the Small "U"-bracket (32) to the indicated Weight Tube (25) with an M8 x 45mm Bolt (68) and an M8 Nylon Locknut (40). 32 87 20 40 13 87 40 20 40 25
-
 1
1 -
2
-
3
-
4
-
5
-
6
-
7
-
 8
8 -
 9
9 -
 10
10 -
 11
11 -
 12
12 -
 13
13 -
 14
14 -
 15
15 -
 16
16 -
 17
17 -
 18
18 -
19
-
20
-
21
-
22
-
23
-
24
-
25
-
26
-
27
-
28
-
29
-
30
-
31
-
32
-
33
-
34
 |
 |
