Weider Pro 2250 English Manual - Page 11
Seat Assembly
 |
View all Weider Pro 2250 manuals
Add to My Manuals
Save this manual to your list of manuals |
Page 11 highlights
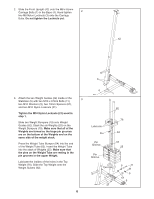
18. Route the Long Cable (23) over the 90mm Pulley (15). Tighten the M10 x 45mm Bolt (83) and the 18 M10 Nylon Locknut (21). 21 55 Bracket 15 83 23 19. Attach the Long Cable (23) to the Small "U"- 19 bracket (67) with an M8 Nylon Locknut (3) and an M8 Washer (8). See the inset drawing. Do not overtighten the Locknut; it should be threaded onto the end of the Cable so that two threads are showing past the nut. 23 Attach the Small "U"-bracket (67) to the Weight Tube (63) with an M8 x 45mm Bolt (72) and an 3 67 M8 Nylon Locknut (3). 72 8 63 3 23 3 67 Seat Assembly 20 20. Attach the Backrest (41) to the Front Upright (42) with two M6 x 65mm Screws (43) and two M6 Washers (10). 41 43 10 42 43 10 11
-
 1
1 -
2
-
3
-
4
-
5
-
 6
6 -
 7
7 -
 8
8 -
 9
9 -
 10
10 -
 11
11 -
 12
12 -
 13
13 -
 14
14 -
 15
15 -
 16
16 -
17
-
18
-
19
-
20
-
21
-
22
-
23
-
24
 |
 |

11
18
23
Bracket
15
83
21
55
20
41
10
10
43
43
23
3
72
63
8
3
67
42
19
18. Route the Long Cable (23) over the 90mm Pulley
(15). Tighten the M10 x 45mm Bolt (83) and the
M10 Nylon Locknut (21).
19. Attach the Long Cable (23) to the Small “U”-
bracket (67) with an M8 Nylon Locknut (3) and an
M8 Washer (8).
See the inset drawing. Do not
overtighten the Locknut; it should be threaded
onto the end of the Cable so that two threads
are showing past the nut.
Attach the Small “U”-bracket (67) to the Weight
Tube (63) with an M8 x 45mm Bolt (72) and an
M8 Nylon Locknut (3).
23
67
3
20. Attach the Backrest (41) to the Front Upright (42)
with two M6 x 65mm Screws (43) and two M6
Washers (10).
Seat Assembly