Weider Pro 318 English Manual - Page 8
adjustment
 |
View all Weider Pro 318 manuals
Add to My Manuals
Save this manual to your list of manuals |
Page 8 highlights
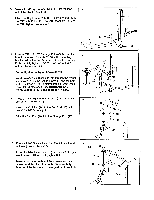
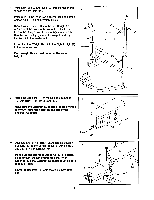
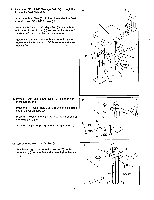
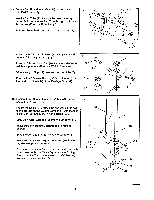
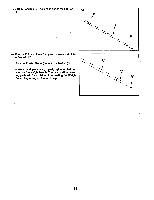
3. Press a 2 1/4" Square Inner Cap (33) into the lower 3 end of the Right Upright (9). Attach the Right Base (7) to the Right Upright (9) with two 5/16" x 3" Bolts (48), two 5/16" Washers (53) and two 5/16" Nylon Locknuts (40). 7 9 53 8 14 A 4. Insert a 5/16" x 2 1/2" Carriage Bolt (47) through the 4 front hole in each Base (6, 7). Slide the mounting bracket (A) on the Bench Frame (5) onto the Carriage Bolts. Partially tighten a 5/16" Nylon Locknut (40) 5 40 onto each Carriage Bolt. Do not tighten the Nylon Locknuts yet. .o • Insert two 5/16" x 2 3/4" Bolts (42) through the mounting bracket (A) on the Bench Frame (5) and the Left and Right Base (6, 7). Partially tighten a 5/16" Nylon Locknut (40) onto each Bolt. Tighten the 5/16" Nylon Locknuts (40) used in steps 1-4 now. 40 6 42 7 5. Press a 1 3/4" Square Inner Cap (19) into the lower end of the Curl Post (10). 5 Attach the Curl Pad (24) to the Curl Post (10) with two 1/4" x 1/2" Screws (45). Slide the Curl Post (10) into the Storage Post (27). 24 45 45 10 19 27 6. Press a 1 1/4" Square Inner Cap (34) into each end of the Adjustment Tube (12). 6 Insert the Adjustment Tube (12) into one set of adjustment brackets (B) on the Uprights (8, 9). I 12 8 Pin Make sure the Adjustment Tube is oriented as shown and that the pins on the Tube are fully inserted into the slots in the adjustment brackets. 34 Pin • 9 8
-
 1
1 -
2
-
 3
3 -
 4
4 -
 5
5 -
 6
6 -
 7
7 -
 8
8 -
 9
9 -
 10
10 -
 11
11 -
 12
12 -
 13
13 -
14
-
15
-
16
-
17
-
18
-
19
-
20
-
21
-
22
-
23
 |
 |
