Weider Pro Lx7 English Manual - Page 11
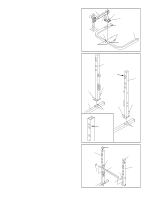
Slide the Weight Stop 15 onto the Lat Tower 47.
 |
View all Weider Pro Lx7 manuals
Add to My Manuals
Save this manual to your list of manuals |
Page 11 highlights
14. Insert a 50 x 50mm Square Cap (20) into the top end 14 of the Lat Tower (47). 12 Locate the Cable (50). Wrap the end with the ball around a Pulley (49). Attach the Pulley to the top end of the Lat Tower (47) with an M10 x 100mm Bolt (12), an M10 Washer (21) and an M10 Nylon Locknut (37). Make sure the Cable is between the Pulley and the 12 welded pin on the Lat Tower. Wrap the Cable (50) around the other Pulley (49). Attach the Pulley to the Lat Tower (47) with an M10 x 100mm Bolt (12), a Cable Trap (51), an M10 Washer (21) and an M10 Nylon Locknut (37). Make sure the Cable Trap (51) is oriented as shown and that the Cable (50) runs smoothly over 47 both Pulleys (49). 20 Pin 49 21 51 37 21 49 37 50 15. Slide the Weight Carriage (48) onto the Lat Tower (47). The Weight Carriage must be oriented as shown. Slide the Weight Stop (15) onto the Lat Tower (47). The Bushing (10) must be facing the Weight Carriage (48). Align the holes in the Weight Stop (15) with the indicated holes in the Lat Tower (47). Attach the Weight Stop to the Lat Tower with an M8 x 72mm Bolt (28) and an M8 Nylon Locknut (36). Attach the Cable (50) to the bracket on the Weight Carriage (48) with an M10 x 19mm Bolt (55) and an M10 Nylon Locknut (37). Do not overtighten the Nylon Locknut. 15 50 37 Align These Holes 28 11 47 48 55 36 10 15
-
 1
1 -
2
-
3
-
4
-
5
-
 6
6 -
 7
7 -
 8
8 -
 9
9 -
 10
10 -
 11
11 -
 12
12 -
 13
13 -
 14
14 -
 15
15 -
 16
16 -
17
-
18
-
19
-
20
-
21
-
22
-
23
 |
 |
