Weider Speed Weight 100 English Manual - Page 5
Assembly - dumbbell set
 |
View all Weider Speed Weight 100 manuals
Add to My Manuals
Save this manual to your list of manuals |
Page 5 highlights
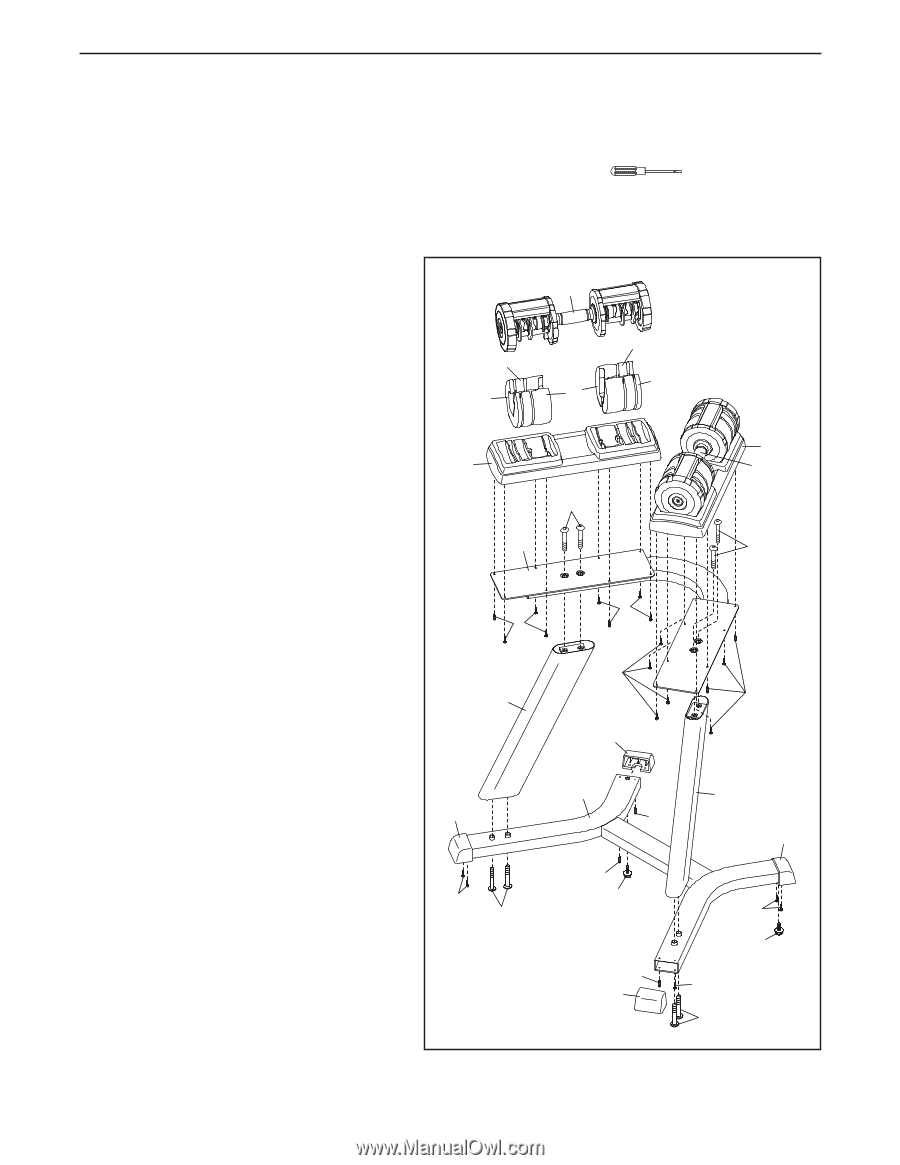
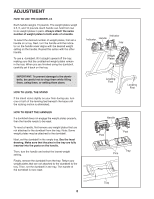
ASSEMBLY Assembly requires two persons. Place all parts of the dumbbells and stand in a cleared area and remove the packing materials. Do not dispose of the packing materials until assembly is completed. In addition to the included tool(s), assembly requires a Phillips screwdriver . Note: If a part is not in the hardware kit, check to see if it has been preassembled. To avoid damaging parts, do not use power tools for assembly. 1. Orient the Base (1) as shown. Attach a Base Cap (4) to the Base with two M4 x 20mm Screws (7). Attach the other three Base Caps (4) in the same way. 2. Tighten the two Leveling Feet (5) into the underside of the Base (1). 3. Orient an Upright (2) as shown. Attach the Upright to the Base (1) with two M10 x 65mm Screws (6). Attach the other Upright (2) in the same way. 4. Orient the Tray Frame (3) as shown. Attach the Tray Frame to the Uprights (2) with four M10 x 65mm Screws (6). 5. Orient a Tray (9) as shown. Tip: Start all the Screws before tightening any of them. Attach the Tray to the Tray Frame (3) with eight M4 x 20mm Screws (7). Attach the other Tray (9) in the same way. 6. Set six Weight Plates (10, 11, 12) in a Tray (9) as shown. Then, press a Handle (8) onto the Weight Plates. Repeat this step for the other Weight Plates and Handle. 7. Make sure that all parts are properly tightened before you use the dumbbells and stand. Note: After assembly is completed, some extra parts may be left over. Place a mat beneath the stand to protect the floor. 8 11 10 11 10 12 9 9 8 6 3 6 7 2 4 7 6 7 7 7 4 1 7 7 5 7 4 2 4 7 5 7 6 5
-
 1
1 -
 2
2 -
 3
3 -
 4
4 -
 5
5 -
 6
6 -
 7
7 -
 8
8
 |
 |