Weslo Bench 500 User Manual - Page 7
Using the Weight Bench
 |
View all Weslo Bench 500 manuals
Add to My Manuals
Save this manual to your list of manuals |
Page 7 highlights
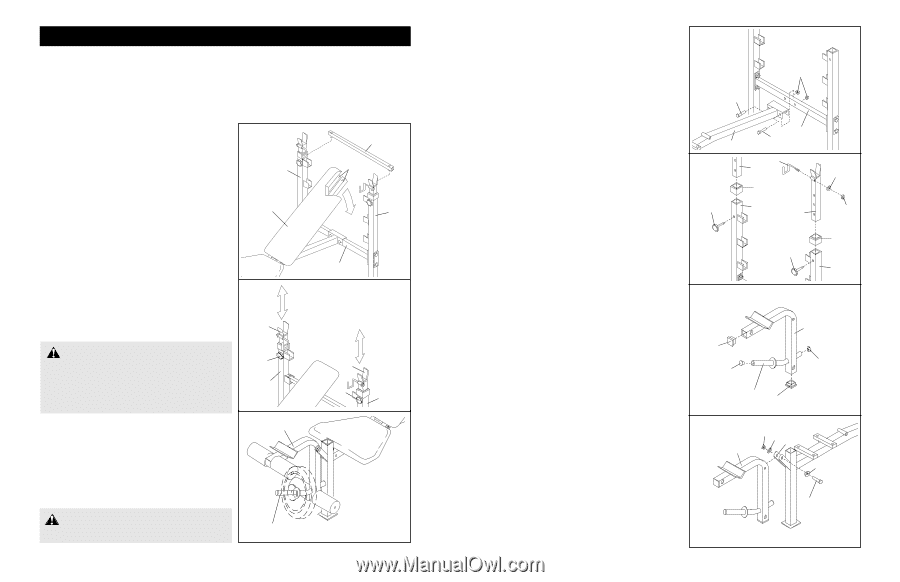
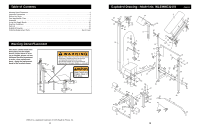
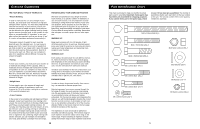
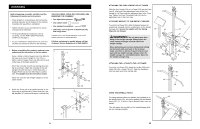
Using the Weight Bench The weight bench is designed to be used with your own weight set (not included). The steps below explain how the weight bench can be adjusted. See EXERCISE GUIDELINES on page 12 for important exercise information Refer also to the exercise information accompanying your weight set (not included) for additional exercises. Inspect and tighten all parts each time you use the weight bench. Replace any worn parts immediately. The weight bench can be cleaned with a damp cloth and a mild, non-abrasive detergent. Do not use solvents. ADJUSTING THE BACKREST The Backrest (6) can be used in a level position, two inclined positions or a declined position. To use the Backrest in a level position, first lift the Backrest. Insert the Support Tube (7) into the lowest set of adjustment 1 brackets in the Uprights (1, 15). Lay the Backrest Tubes (5) on the Support Tube. 7 5 To use the Backrest (6) in an inclined position, first lift the 6 Backrest. Insert the Support Tube (7) into one of the two upper sets of adjustment brackets in the Uprights (1, 15). Lay the Backrest Tubes (5) on the Support Tube. To use the Backrest (6) in a declined position, lift the Backrest and remove the Support Tube. Lay the Backrest Tubes (5) on the Crossbar (3). 15 3 ADJUSTING THE WEIGHT RESTS To adjust the Weight Rests (16), remove the Large Threaded Knobs (20) from the Uprights (1, 15). Move the Weight Rests to the desired height. Replace the Large Threaded Knobs. 16 WARNING: Always set both weight rests at the same height. Each large threaded 20 knob must always be inserted through both the weight rest and the upright and firmly tightened. 1 Never tighten a knob into an upright and then set a weight rest in the upright on top of the knob. 16 20 15 4 ATTACHING WEIGHTS TO THE LEG LEVER Note: Remove the curl upright or lat tower before using the leg lever (see the next page). To use the Leg Lever (4), slide the desired weights (not included) onto the weight tube. Secure the weights with a Spring Clip (45, not shown). WARNING: Do not place more than 22 kg on the Leg Lever (4) for normal use. Weight Tube 10 3. Attach the Frame (2) to the Crossbar (3) with two 3 M8 x 55mm Bolts (25) and two M8 Nylon Locknuts (34). 34 25 4. Press a 50mm Square Bushing (31) onto each Upright (1, 15) and then tap the Bushings into place with a rubber mallet. Slide a Weight Rest (16) into the Right Upright (1). Align one of the adjustment holes in the Weight Rest with the adjustment hole in the Upright. Tighten the Large Threaded Knob (20) into the adjustment hole in the Upright. Attach the other Weight Rest (16) to the Left Upright (15) in the same manner. Attach the Left Barbell Hook (47) to the left Weight Rest (16) with an M8 Washer (17) and an M8 Nylon Locknut (34). Note: Make sure that the Barbell Hook is on the inside of the Weight Rest. Attach the Right Barbell Hook (46, not shown) to the other Weight Rest in the same manner. 5. Tap a 38mm Square Inner Cap (32) into each end of the Leg Lever (4). Tap a 25.4mm Round Inner Cap (21) into each end of the weight tube. 6. Lubricate the M10 x 70mm Bolt (26). Attach the Leg Lever (4) to the Front Leg (8) with the Bolt, two M10 Washers (29) and an M10 Nylon Locknut (30). Do not overtighten the Nylon Locknut (30). The lever must pivot freely. 2 4 20 3 25 47 16 31 1 16 20 5 17 34 31 15 32 21 Weight Tube 32 4 21 6 30 29 8 4 29 26-Lubricate 7
-
 1
1 -
 2
2 -
 3
3 -
 4
4 -
 5
5 -
 6
6 -
 7
7 -
 8
8
 |
 |