Weslo Bench 500 User Manual - Page 8
the Support Tube 7. Set the Support Tube in
 |
View all Weslo Bench 500 manuals
Add to My Manuals
Save this manual to your list of manuals |
Page 8 highlights
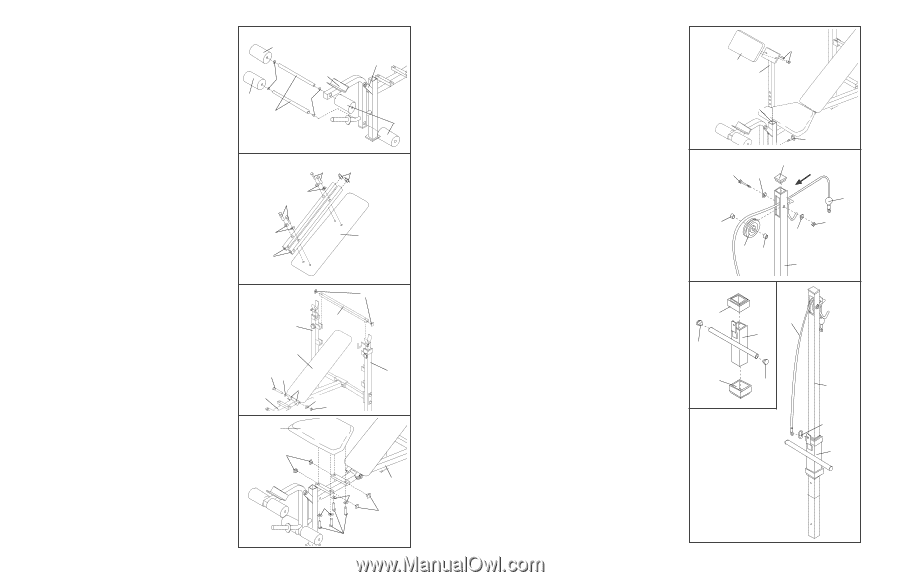
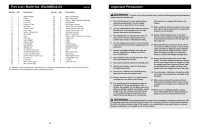
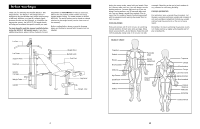
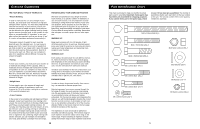
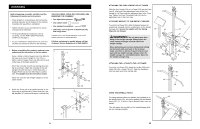
7. Press two 19mm Round Inner Caps (33) into each Pad Tube (10). Insert the Pad Tubes (10) into the holes in the Leg Lever (4). Slide two Foam Pads (22) onto each Pad Tube. 7 22 33 22 10 4 33 8 22 8. Press a 1" Square Inner Cap (18) into the indicated end of each Backrest Tube (5). Attach each Backrest Tube (5) to the Backrest (6) with two M8 x 40mm Bolts (27) and two M8 Washers (17). The Backrest Tubes must be oriented as shown. Do not tighten the four Bolts (27) yet. 8 27 18 17 27 17 6 5 9. Press a 1" Square Inner Cap (18) into each end of the Support Tube (7). Set the Support Tube in the highest set of adjustment brackets on the Uprights (1, 15). Lubricate the M10 x 130mm Bolt (9). Attach the Backrest Tubes (5) to the Frame (2) with the Bolt, two M10 Washers (29), and an M10 Nylon Locknut (30). Do not overtighten the Nylon Locknut. Rest the Backrest (6) on the Support Tube (7). Tighten the four M8 x 40mm Bolts (27) securing the support tubes to the seat (see step 8). 10. Press two 1" Square Inner Caps (18) into each seat support bracket on the Frame (2). Attach the Seat (11) to the seat support brackets on the Frame (2) with four M8 x 40mm Bolts (27) and four M8 Washers (17). 9 7 1 6 9 29 5 2 10 11 29 30 18 18 15 17 17 2 18 27 8 11. Attach the Curl Pad (12) to the Curl Upright (13) 11 with two M6 x 16mm Screws (24). Slide the Curl Upright (13) into the Front Leg (8). Align one of the adjustment holes in the Curl Upright with the adjustment hole in the Front Leg. Tighten the Small Threaded Knob (19) into the adjustment hole in the Front Leg. Note: The Lat Tower (see below) can be attached in the same manner. 24 12 13 8 12. Locate the Cable (38) and note that it has a loop on one end and a ball on the other. Slide the loop through the slot in the Lat Tower (23) from the direction shown. Place the Cable (38) in the groove of the Pulley (39) and attach the Pulley inside the slot in the Lat Tower (23) with the M10 x 52mm Bolt (35), two M10 Washers (29), two Pulley Spacers (40) and an M10 Nylon Locknut (30). Press a 38mm Square Inner Cap (32) into the top of the Lat Tower (23). 19 12 32 35 29 38 40 39 40 30 29 23 13. Press a Carriage Bushing (41) onto each end of the Weight Carriage (42). Press a 25.4mm Round Inner Cap (21) into each end of the weight tube on the Weight Carriage. 13 41 Slide the Weight Carriage (42) onto the Lat Tower (23). Make sure the Weight Carriage is oriented as shown. 21 Attach the loop on the Cable (38) to the bracket on the Weight Carriage (42) with a Cable Clip (37). 41 The Lat Tower (23) can be mounted in the Front Leg (8) in the same way as the Curl Pad (see step 11). 38 42 21 23 37 42 14. Make sure all parts are properly tightened before you use the weight bench. The use of all remaining parts will be explained in USING THE WEIGHT BENCH starting on the next page. 9
-
 1
1 -
2
-
 3
3 -
 4
4 -
 5
5 -
 6
6 -
 7
7 -
 8
8
 |
 |