Weslo Pursuit 895i User Manual - Page 6
Assembly
 |
View all Weslo Pursuit 895i manuals
Add to My Manuals
Save this manual to your list of manuals |
Page 6 highlights
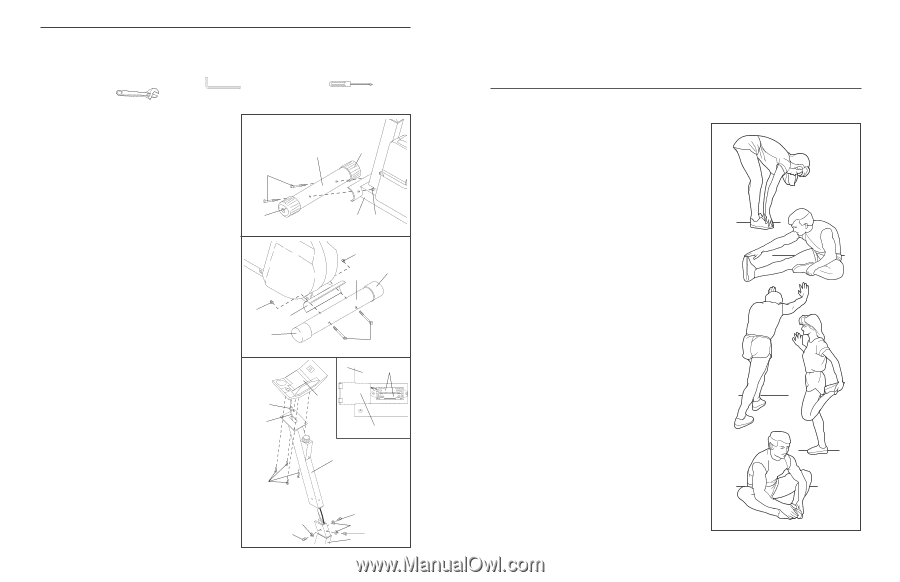
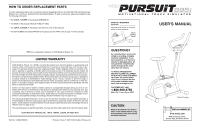
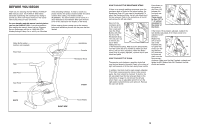
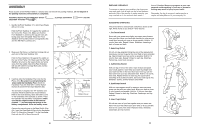
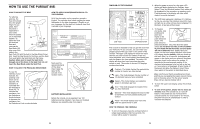
ASSEMBLY Place all parts of the PURSUIT 895i in a cleared area and remove the packing materials. Do not dispose of the packing materials until assembly is completed. Assembly requires the included allen wrench adjustable wrenches . , a phillips screwdriver and two 1. Identify the Front Stabilizer (17), which has Wheels (25) on the ends. Hold the Front Stabilizer (17) against the saddle on the front of the Frame (15). Make sure that the Front Stabilizer is turned so the square holes are facing away from the saddle. Attach the Front Stabilizer with two M8 x 80mm Carriage Bolts (30) and two M8 Nylon Locknuts (21). 1 30 17 25 2. Make sure that there is a Stabilizer Endcap (48) on each end of the Rear Stabilizer (18). Hold the Rear Stabilizer (18) against the saddle on the rear of the Frame (15). Make sure that the Rear Stabilizer is turned so the square holes are facing away from the saddle. Attach the Rear Stabilizer with two M8 x 80mm Carriage Bolts (30) and two M8 Nylon Locknuts (21). 3. Carefully slide the Handlebar Post (14) into the Frame (15). Be careful to avoid pinching the wires inside the Handlebar Post. Attach the Handlebar Post with three M10 x 25mm Button Screws (8) and three M10 Split Washers (63). The Console (7) requires two ÒAAÓ batteries (not included). Alkaline batteries are recommended. Refer to the inset drawing. Open the battery cover on the underside of the Console as shown. Press two batteries into the battery compartment. Make sure that the negative ends of the batteries (marked ÒÐÓ) are touching the springs in the battery compartment. Close the battery cover. Connect the console wire to the Reed Switch Wire (54). Insert the Reed Switch Wire into the Handlebar Post (14). Attach the Console (7) to the Handlebar Post with four M4 x 16mm Screws (4). 6 25 2 15 21 21 48 18 21 15 48 3 30 7 Batteries Console Wire 54 4 7 Battery Cover 14 63 8 8 63 8 15 EXERCISE FREQUENCY To maintain or improve your condition, plan three workouts each week, with at least one day of rest between workouts. After a few months of regular exercise, you may complete up to five workouts each week, if desired. Caution: Be sure to progress at your own pace and avoid overdoing it. Incorrect or excessive training may result in injury to your health. Remember, the key to success is make exercise a regular and enjoyable part of your everyday life. SUGGESTED STRETCHES The correct form for several basic stretches is shown at the right. Move slowly as you stretchÑnever bounce. 1. Toe Touch Stretch Stand with your knees bent slightly and slowly bend forward from your hips. Allow your back and shoulders to relax as you reach down toward your toes as far as possible. Hold for 15 counts, then relax. Repeat 3 times. Stretches: Hamstrings, back of knees and back. 2. Hamstring Stretch Sit with one leg extended. Bring the sole of the opposite foot toward you and rest it against the inner thigh of your extended leg. Reach toward your toes as far as possible. Hold for 15 counts, then relax. Repeat 3 times for each leg. Stretches: Hamstrings, lower back and groin. 3. Calf/Achilles Stretch With one leg in front of the other, reach forward and place your hands against a wall. Keep your back leg straight and your back foot flat on the floor. Bend your front leg, lean forward and move your hips toward the wall. Hold for 15 counts, then relax. Repeat 3 times for each leg. To cause further stretching of the achilles tendons, bend your back leg as well. Stretches: Calves, achilles tendons and ankles. 4. Quadriceps Stretch With one hand against a wall for balance, reach back and grasp one foot with your other hand. Bring your heel as close to your buttocks as possible. Hold for 15 counts, then relax. Repeat 3 times for each leg. Stretches: Quadriceps and hip muscles. 5. Inner Thigh Stretch Sit with the soles of your feet together and your knees outward. Pull your feet toward your groin area as far as possible. Hold for 15 counts, then relax. Repeat 3 times. Stretches: Quadriceps and hip muscles. 1 2 3 4 5 11
-
 1
1 -
 2
2 -
 3
3 -
 4
4 -
 5
5 -
 6
6 -
 7
7 -
 8
8
 |
 |