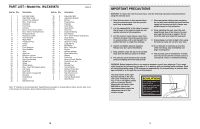
Weslo Pursuit 895i User Manual - Page 8
How To Use The Pursuit 895i
 |
View all Weslo Pursuit 895i manuals
Add to My Manuals
Save this manual to your list of manuals |
Page 8 highlights
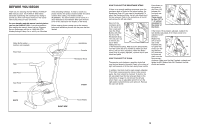
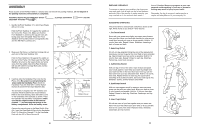
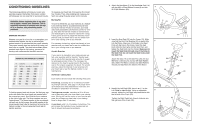
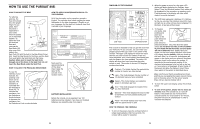
HOW TO USE THE PURSUIT 895i HOW TO ADJUST THE SEAT For effective exercise, the Seat (19) should be at the proper height. As you pedal, there should be a 19 slight bend in your knees when the pedals are in the lowest 20 position. To 29 adjust the Seat, first hold the Seat and 64 unscrew the Seat Knob (29). Align one of the holes in the Seat Post (20) with the hole in the Side Shield Cover (64). Insert the Seat Knob into the frame and the Seat Post, and tighten the Seat Knob into the frame. Caution: Make sure to insert the Seat Knob through one of the holes in the Seat Post; do not insert the Seat Knob under the Seat Post. HOW TO ADJUST THE PEDALING RESISTANCE To vary the intensity of your exercise, the pedaling resis- tance can be adjusted. The resistance is controlled with the Resistance Knob (10). To 10 increase the resistance, turn the Resistance Knob clockwise; to decrease the resistance, turn the Resistance Knob counterclockwise. HOW TO APPLY AN INFORMATION DECAL TO THE CONSOLE All of the information on the console is printed in English. The included decal sheet contains the same information in five other languages. If English is not your language, find the decal on the decal sheet that is printed in your language. Next, peel the appropriate decal off the decal sheet. Apply the decal to the console in the location shown. BATTERY INSTALLATION Before the console can be operated, two ÒAAÓ batteries must be installed. If you have not installed batteries, see assembly step 3 on page 6. 8 DIAGRAM OF THE CONSOLE Upper LCD Display Lower LCD Display LED Track On/Reset Button The console is designed to help you get the most from your workouts. As you exercise, you can watch your progress around the LED ÒtrackÓ in the center of the console. The upper LCD display will show how many calories you have burned, the number of laps you have completed, your current speed, the elapsed time, and the distance you have pedaled. The lower LCD display will show your heart rate when the pulse sensor is used. The modes of the two LCD displays are described below. CaloriesÑThis mode displays the approximate number of calories you have burned. LapsÑThis mode displays the total number of 1/4-kilometer laps you have completed. SpeedÑThis mode displays your pedaling speed, in kilometers per hour. TimeÑThis mode displays the length of time you have exercised. DistanceÑThis mode displays the total number of kilometers you have pedaled during your workout. PulseÑThis mode displays your heart rate when the pulse sensor is used. 2. When the power is turned on, the upper LCD display will begin displaying the Calories, Laps, Speed, Time, and Distance modes. Each mode will be displayed for five seconds in a repeating cycle. Flashing arrows in the display will show which mode is currently displayed. 3. The LED track represents a distance of 1/4 kilometer. As you exercise, the indicators around the track will light one at a time until you have completed 1/4 kilometer. A new lap will then begin. 4. To measure your pulse, stop pedaling and place your thumb on the pulse sensor as shown. The pulse sensor is pressure-activatedÑfully press down the pulse sensor. Do not press too hard, or the circulation in your thumb will be restricted, and your pulse will not be detected. Next, slightly raise your thumb until the heart-shaped indicator in the lower LCD display flashes steadily. Hold your thumb at this level. After 5 to 10 seconds, three dashes will appear in the display and your pulse will be shown. Hold your thumb on the sensor for another 15 seconds for the most accurate reading. If the displayed pulse appears to be too high or too low, or if your pulse is not displayed, lift your thumb off the sensor and allow the display to reset. Press down again on the sensor as described above. Make sure that your thumb is positioned as shown, and that you are applying the proper amount of pressure to the pulse sensor. Try the sensor several times until you become familiar with it. 5. To reset the upper LCD display, press the on/reset button. 6. To turn off the power, simply wait for about six minutes. Note: The console has an Òauto-offÓ feature. If the pedals are not moved and the console buttons are not pressed for six minutes, the power will turn off automatically in order to conserve the batteries. HOW TO OPERATE THE CONSOLE 1. To turn on the power, press the on/reset button or simply begin pedaling. After two seconds, the console will be ready for operation. 9
-
 1
1 -
2
-
 3
3 -
 4
4 -
 5
5 -
 6
6 -
 7
7 -
 8
8
 |
 |
