WestBend 82310R Instruction Manual - Page 4
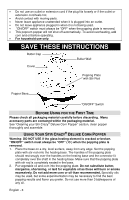
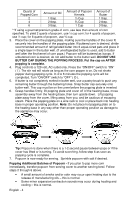
DO NOT USE, BUTTER CAP DURING THE POPPING PROCESS. Put the cap on AFTER, popping is complete.,
 |
View all WestBend 82310R manuals
Add to My Manuals
Save this manual to your list of manuals |
Page 4 highlights
Quarts of Popped Corn 2 4 6 Amount of Oil 1 tbsp. 2 tbsp. 3 tbsp. Amount of Popcorn Kernels Cup Cup 1 Cup Amount of Butter 1 tbsp. 2 tbsp. 3 tbsp. **If using a gourmet/premium grade of corn, use less than amount of corn specified. To yield 2 quarts of popcorn, use ¼ cup corn; for 4 quarts of popcorn, use ½ cup; for 6 quarts of popcorn, use ¾ cup. 3. Place the cover on the popping plate, making sure the handles of the cover fit securely into the handles of the popping plate. If buttered corn is desired, divide recommended amount of refrigerated butter into 6 equal-sized pats and place in a single layer in the butter well. (If unrefrigerated butter is used, add to butter well after the first kernel of corn pops.) Popcorn will be buttered as it pops. If unbuttered corn is desired, do not add butter to the butter well. DO NOT USE BUTTER CAP DURING THE POPPING PROCESS. Put the cap on AFTER popping is complete. 4. Plug cord into a 120 volt, AC outlet only. Press the "ON/OFF" switch to "ON" ( l ). The stir rod will rotate as long as the corn popper is on. Do not shake popper during popping cycle. In 4 to 6 minutes the popping cycle will be completed. Turn "ON/OFF" switch to "OFF" ( O ). 5. If butter is not completely melted in butter well, use a pastry brush to push any remaining butter through the buttering holes. Snap butter cap securely onto butter well. This cap must be on the cover before the popping plate is inverted. 6. Grasp handles firmly, lift popping plate and cover off of the heating base, move assembly away from the heating base, then turn upside down. Lift popping plate away from the cover, lifting away from you, and be cautious of escaping steam. Place the popping plate on a wire rack to cool or place back into heating base in proper operating position. Note: Do not place hot popping plate on to the heating base in any way other than proper operating position as damage to the appliance may occur. Tip: Popcorn is done when there is a 1-2 second pause between pops or if the cover has lifted or is turning. To avoid scorching, follow step 6 as soon as popping cycle is complete. 7. Popcorn is now ready for serving. Sprinkle popcorn with salt if desired. Popping Additional Batches of Popcorn - If you plan to pop more corn immediately, transfer popcorn from serving cover to another serving bowl. Follow steps 2 through 6 above. • A small amount of smoke and/or odor may occur upon heating due to the release of manufacturing oils - this is normal. • Some minor expansion/contraction sounds may occur during heating and cooling - this is normal. English - 4
-
 1
1 -
 2
2 -
 3
3 -
 4
4 -
 5
5 -
 6
6 -
 7
7 -
 8
8 -
 9
9 -
 10
10 -
11
-
12
-
13
-
14
-
15
-
16
-
17
-
18
-
19
-
20
 |
 |
