WestBend MG38ACL Instruction Manual - Page 7
Rotisserie Function Using The Rotisserie Forks
 |
View all WestBend MG38ACL manuals
Add to My Manuals
Save this manual to your list of manuals |
Page 7 highlights
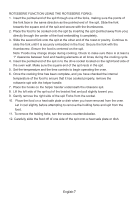
ROTISSERIE FUNCTION USING THE ROTISSERIE FORKS: 1. Insert the pointed end of the spit through one of the forks, making sure the points of the fork face in the same direction as the pointed end of the spit. Slide the fork towards the square end of the spit and secure with the thumbscrew. 2. Place the food to be cooked onto the spit by inserting the spit (pointed away from you) directly through the center of the food embedding it completely. 3. Slide the second fork onto the spit at the other end of the roast or poultry. Continue to slide the fork until it is securely embedded in the food. Secure the fork with the thumbscrew. Ensure the food is centered on the spit. Note: Foods may change shape during cooking. Check to make sure there is at least a 1" clearance between food and heating elements at all times during the cooking cycle. 4. Insert the pointed end of the spit in to the drive socket located on the right-hand side of the oven wall. Make sure the square end of the spit rests in the spit. 5. Set the temperature and the time controls to begin operating the oven. 6. Once the cooking time has been complete, and you have checked the internal temperature of the food to ensure that it has cooked properly, remove the rotisserie spit with the helper handle. 7. Place the hooks on the helper hander underneath the rotisserie spit. 8. Lift the left side of the spit out of the bracket first and pull slightly toward you. 9. Gently remove the right side of the spit Forks from the socket. 10. Place the food on a heat safe plate or dish when you have removed from the oven. Let it cool slightly before attempting to remove the holding forks and spit from the food. 11. To remove the holding forks, turn the screws counterclockwise. 12. Carefully slide the food off of one side of the spit onto a heat safe plate or dish. English-7
-
 1
1 -
 2
2 -
 3
3 -
 4
4 -
 5
5 -
 6
6 -
 7
7 -
 8
8 -
 9
9 -
 10
10 -
 11
11 -
 12
12 -
13
-
14
-
15
-
16
-
17
-
18
-
19
-
20
 |
 |