Western Digital Sentinel DS6100 Administrator and Maintenance Guide - Page 26
Important, Con Close - review
 |
View all Western Digital Sentinel DS6100 manuals
Add to My Manuals
Save this manual to your list of manuals |
Page 26 highlights
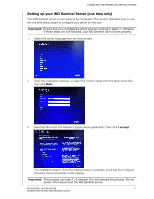
CONNECTING THE SERVER AND GETTING STARTED 8. Select your Update settings. This specifies how you'd like your device to install system updates. 9. Click Configure. Important: This process can take an hour or more and may restart more than once. Do not interrupt the process. Do not power off or disconnect the WD Sentinel server. 10. Review the information on the Configuration Completed screen, then click Close. Windows Server 2012 R2 is now installed. WD SENTINEL DS5100/DS6100 20 ADMINISTRATOR AND MAINTENANCE GUIDE
-
 1
1 -
2
-
3
-
4
-
5
-
6
-
7
-
8
-
9
-
10
-
11
-
12
-
13
-
14
-
15
-
16
-
17
-
18
-
19
-
20
-
 21
21 -
 22
22 -
 23
23 -
 24
24 -
 25
25 -
 26
26 -
 27
27 -
 28
28 -
 29
29 -
 30
30 -
 31
31 -
32
-
33
-
34
-
35
-
36
-
37
-
38
-
39
-
40
-
41
-
42
-
43
-
44
-
45
-
46
-
47
-
48
-
49
-
50
-
51
-
52
-
53
-
54
-
55
-
56
-
57
-
58
-
59
-
60
-
61
-
62
-
63
-
64
-
65
-
66
-
67
-
68
-
69
-
70
-
71
-
72
-
73
-
74
-
75
-
76
-
77
-
78
-
79
-
80
-
81
-
82
-
83
-
84
-
85
-
86
-
87
-
88
-
89
-
90
-
91
-
92
-
93
-
94
-
95
-
96
-
97
-
98
-
99
-
100
-
101
-
102
-
103
-
104
-
105
-
106
-
107
 |
 |

CONNECTING THE SERVER AND GETTING STARTED
20
WD SENTINEL DS5100/DS6100
ADMINISTRATOR AND MAINTENANCE GUIDE
8.
Select your Update settings. This specifies how you’d like your device to install system
updates.
9.
Click
Configure.
10.
Review the information on the Configuration Completed screen, then click
Close
.
Windows Server 2012 R2 is now installed.
Important:
This process can take an hour or more and may restart more than once. Do
not interrupt the process. Do not power off or disconnect the WD Sentinel server.