Whirlpool GI15NFRXB Use & Care Guide - Page 7
Ice Maker Door
 |
View all Whirlpool GI15NFRXB manuals
Add to My Manuals
Save this manual to your list of manuals |
Page 7 highlights
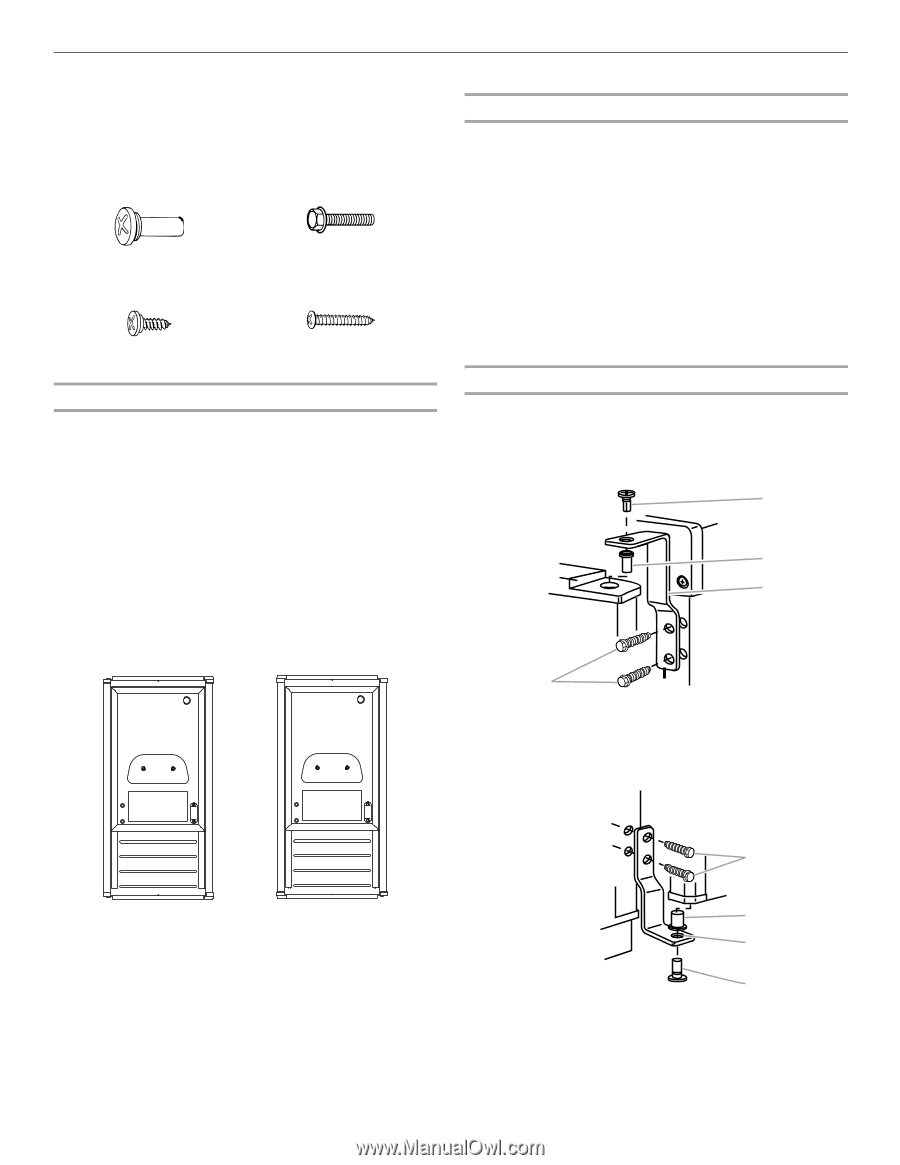
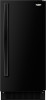
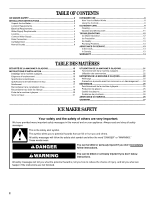
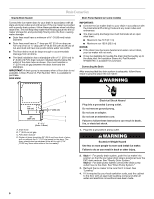
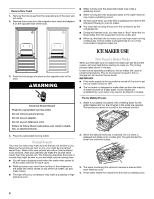
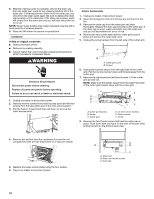
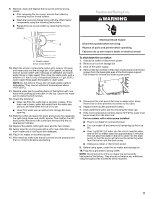
Ice Maker Door Tools needed: Gather the required tools and parts before starting installation. Reverse Hinges wrench wrench Hinge pin Handle screw ■ Flat putty knife ■ Phillips screwdriver Hex head hinge screw End cap screw 1. Unscrew and remove the top hinge. Replace the screws in the empty hinge holes. 2. Remove the screws from the bottom of the opposite side of the ice maker cabinet. Turn the top hinge upside down so that the hinge pin points up. Place the hinge on the bottom opposite side of the ice maker and tighten screws. 3. Remove the plastic hinge pin sleeve from the "old" bottom hinge and replace it on the new bottom hinge pin. 4. Remove the "old" bottom hinge screws and hinge. Replace the screws in the empty hinge holes. 5. Remove the screws from the top of the opposite side of the ice maker cabinet. Turn the hinge upside down so that the hinge pin points down. Place the hinge on the top opposite side of the ice maker and tighten the screws. 6. Remove the top hinge pin. Remove door 1. Unplug ice maker or disconnect power. 2. Remove the handle screws and handle (on some models). Keep the parts together and set them aside. 3. Remove the hinge pin from the top hinge. 4. Remove the door from the hinges and screw the top hinge pin back into the top hinge. 5. Reverse the door end caps as follows: ■ Remove the screw and end cap from the top corner. Move it diagonally to the opposite side's bottom corner, keeping the straight side of the end cap facing the front of the ice maker. ■ Remove the screw and end cap from the bottom corner. Move it diagonally to the opposite side's top corner, keeping the straight side of the end cap facing the front of the ice maker. Replace Door 1. Place plastic hinge pin sleeve in the top hinge hole on the door. Align the door with the top hinge hole and replace the top hinge pin. 2. Replace the handle and handle screws. Top Hinge A B C A B C D D A. Hinge pin B. Hinge pin sleeve C. Hinge D. Hex-head hinge screw Bottom Hinge D C B A A. Top corner open (no end cap) B. Beginning top corner end cap C. Beginning bottom corner end cap D. Bottom corner open (no end cap) 6. Set the door aside. A B C D A. Hex-head hinge screw B. Hinge pin sleeve C. Hinge D. Hinge pin 7
-
 1
1 -
 2
2 -
 3
3 -
 4
4 -
 5
5 -
 6
6 -
 7
7 -
 8
8 -
 9
9 -
 10
10 -
 11
11 -
 12
12 -
13
-
14
-
15
-
16
-
17
-
18
-
19
-
20
-
21
-
22
-
23
-
24
-
25
-
26
-
27
-
28
 |
 |