Whirlpool LTE5243DQ Installation Instructions - Page 13
Secure Drain Hose, Plan Vent System - model
 |
UPC - 050946532578
View all Whirlpool LTE5243DQ manuals
Add to My Manuals
Save this manual to your list of manuals |
Page 13 highlights
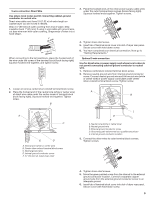
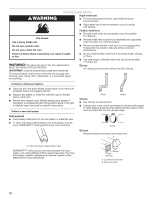
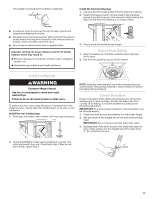
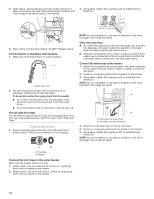
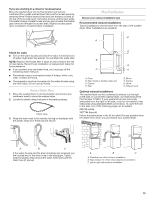
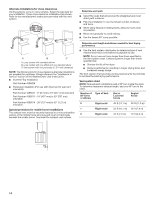
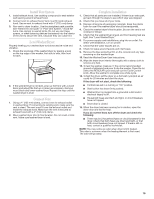
If you are working in a closet or recessed area Move the washer/dryer into its final location and remove cardboard from under washer/dryer. Remove the access panel by removing three Phillips-head screws and one bumper, located at the top of the access panel. Set panel, screws, and bumper aside. Complete hookup of water hoses and (on gas models) the flexible gas connector through the access area. Replace access panel upon completion of washer/dryer installation. Plan Vent System Choose your exhaust installation type Recommended exhaust installations Typical installations vent the dryer from the rear of the washer/ dryer. Other installations are possible. D A Check for leaks Turn on the water faucets and check for leaks. A small amount of water might enter the washer. You will drain this water later. NOTE: Replace inlet hoses after 5 years of use to reduce the risk of hose failure. Record hose installation or replacement dates for future reference. If you connect only one water hose, you must cap off the remaining water inlet port. Periodically inspect and replace hoses if bulges, kinks, cuts, wear, or leaks are found. The apparatus must be connected to the water faucets using the new hoses. Do not use old hoses. Secure Drain Hose 1. Move the washer/dryer to its final location and remove any cardboard used to move the washer/dryer. 2. Locate the plastic strap included in the parts package. Plastic strap 3. Wrap the drain hose to the laundry tub leg or standpipe with the plastic strap (A or B below) and secure. E F B G C H A. Dryer B. Rigid metal or flexible metal vent C. Clamps D. Wall E. Elbow F. Clamps G. Elbow H. Exhaust hood Optional exhaust installations This washer/dryer can be converted to exhaust out the right or left side. To convert the washer/dryer, use Side Exhaust Kit Part Number 279823. If your washer/dryer was previously exhausted from the right or left side, it can be converted to rear exhaust by using standard offset connections. To cover the hole in the side, one of the following plugs can be added: 692790 (white) 3977784 (biscuit) Follow the instructions in the kit to install. Kits are available from the dealer from whom you purchased your washer/dryer. A B C If the water faucets and the drain standpipe are recessed, put the hooked end of the drain hose in the standpipe. Tightly wrap the plastic strap around the water inlet hoses and the drain hose (C above). A B C A. Standard rear offset exhaust installation B. Rear exhaust for offset close clearance connection C. Left or right side exhaust installation 13
-
 1
1 -
2
-
3
-
4
-
5
-
6
-
7
-
 8
8 -
 9
9 -
 10
10 -
 11
11 -
 12
12 -
 13
13 -
 14
14 -
 15
15 -
 16
16
 |
 |