Whirlpool LTE5243DQ Installation Instructions - Page 2
Installation Instructions - washer
 |
UPC - 050946532578
View all Whirlpool LTE5243DQ manuals
Add to My Manuals
Save this manual to your list of manuals |
Page 2 highlights
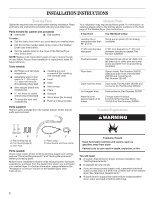
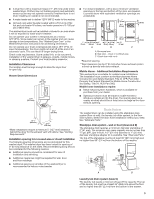
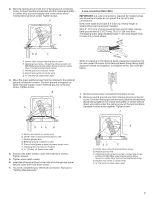
INSTALLATION INSTRUCTIONS Tools and Parts Gather the required tools and parts before starting installation. Read and follow the instructions provided with any tools listed here. Parts needed for washer (not provided): Inlet hoses Flat washers To order: Call the dealer from whom you purchased your washer/dryer. Call the toll-free number listed on the cover of the Washer/ Dryer User Instructions. Visit the website listed on the cover of the Washer/Dryer User Instructions. NOTE: Replace inlet hoses after 5 years of use to reduce the risk of hose failure. Record hose installation or replacement dates for future reference. Tools needed: #2 Phillips and flat-blade screwdriver Adjustable wrench that opens to 1" (25 mm) or 9⁄16" open-end wrench (for adjusting dryer feet) Wire stripper (direct wire installations) ¼" nut driver or socket wrench (recommended) Tin snips (for new vent installations) Caulking gun and compound (for installing new exhaust vent) Level Knife Vent clamps Pliers Scissors Wood block (for leveling) Ruler or measuring tape Parts supplied: Remove parts package from the washer basket. Check that all parts were included. Alternate Parts Your installation may require additional parts. For information on ordering, please refer to the toll free phone numbers on the front page of the Washer/Dryer User Instructions. If You Have You Will Need to Buy Laundry tub or standpipe taller than 96" (2.4 m) Sump pump system (if not already available) 1" (25 mm) diameter standpipe 2" (51 mm) diameter to 1" (25 mm) diameter standpipe adapter, Part Number 3363920 Overhead sewer Standard 20 gal. (76 L) 34" (864 mm) tall drain tub or utility sink and sump pump (available from local plumbing suppliers) Floor drain Siphon break, Part Number 285320, additional drain hose, Part Number 285702 and connector kit, Part Number 285442 Drain hose too short Drain hose, Part Number 285664 and connector kit, Part Number 285442 Lint clogged drain Drain protector, Part Number 367031 Water faucets beyond reach of fill hoses 2 longer water fill hoses: 6 ft (1.8 m) Part Number 76314, 10 ft (3.0 m) Part Number 350008 Location Requirements WARNING A B C A. Rear leveling legs (2) B. Front leveling legs (2) C. Drain hose D E D. Plastic strap E. Silver double-wire hose clamp Parts needed: Check local codes. Check existing electrical supply and venting, and see "Electrical Requirements" and "Venting Requirements" before purchasing parts. Mobile home installations require metal exhaust system hardware available for purchase from the dealer from whom you purchased your washer/dryer. For further information, please reference the "Assistance or Service" section of the Washer/Dryer User Instructions. Explosion Hazard Keep flammable materials and vapors, such as gasoline, away from dryer. Failure to do so can result in death, explosion, or fire. You will need A location that allows for proper exhaust installation. See "Venting Requirements." A separate 30-amp circuit. If you are using a power supply cord, a grounded electrical outlet located within 2 ft (610 mm) of either side of the washer/ dryer. See "Electrical Requirements." A sturdy floor to support the washer/dryer weight (washer/ dryer, water and load) of 500 lbs (226.8 kg). 2
-
 1
1 -
 2
2 -
 3
3 -
 4
4 -
 5
5 -
 6
6 -
 7
7 -
 8
8 -
9
-
10
-
11
-
12
-
13
-
14
-
15
-
16
 |
 |