Whirlpool UDT518SAHP Installation Instructions - Page 17
Wiring configuration
 |
View all Whirlpool UDT518SAHP manuals
Add to My Manuals
Save this manual to your list of manuals |
Page 17 highlights
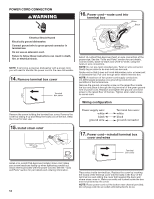
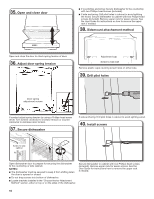
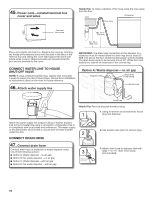
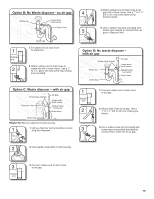
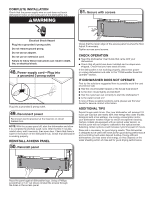
41. Reinstall plastic caps 43. Install strain relief Reinstall plastic caps to cover screw heads. DIRECT WIRE ELECTRICAL CONNECTION WARNING Install a UL Listed/CSA Approved metallic strain relief. Make sure screw heads are facing up when tightening conduit nut. Strain relief is provided with the power cord kit. See the "Tools and Parts" section for part details and ordering information. 44. Direct Wire-Route cable into terminal box ground white black Electrical Shock Hazard Electrically ground dishwasher. Connect ground wire to green ground connector in terminal box. Do not use an extension cord. Failure to follow these instructions can result in death, fire, or electrical shock. 42. Remove terminal box cover Terminal box cover Remove the screw holding the terminal box cover. Remove the cover by sliding it up and lifting its hooks out of the slot. Retain cover for later use. Select UL Listed/CSA Approved twist-on wire connectors of the proper size. See the "Tools and Parts" section at the front of the guide for part details. Connect wires, black-to-black and white-to-white, using the twist-on wire connectors. NOTE: Do not pre-twist stranded wire. Twist on the wire connector. Gently tug on wires to be sure both are secured. Route cable so that it does not touch dishwasher motor or lower part of dishwasher tub. Pull cable through UL Listed/CSA Approved strain relief in terminal box. NOTE: A maximum of two field wiring supply conductors (12 AWG largest size) plus one grounding conductor are permitted in the terminal box. Form bare ground wire into a U-shaped hook. Wrap ground wire hook clockwise around the ground connector screw on the raised floor inside the box and under the washer. Securely tighten ground connector. Tighten strain relief screws to secure cable. Make sure screw heads are facing up when tightening conduit nut. Wiring configuration 17
-
 1
1 -
2
-
3
-
4
-
5
-
6
-
7
-
8
-
9
-
10
-
11
-
 12
12 -
 13
13 -
 14
14 -
 15
15 -
 16
16 -
 17
17 -
 18
18 -
 19
19 -
 20
20 -
 21
21 -
 22
22 -
23
-
24
-
25
-
26
-
27
-
28
-
29
-
30
-
31
-
32
-
33
-
34
-
35
-
36
-
37
-
38
-
39
-
40
-
41
-
42
-
43
-
44
-
45
-
46
-
47
-
48
-
49
-
50
-
51
-
52
-
53
-
54
-
55
-
56
-
57
-
58
-
59
-
60
 |
 |
