Whirlpool WDF550SAAB Installation Guide - Page 11
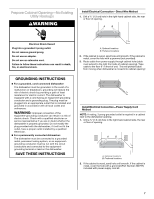
Make Electrical Connections, Direct Wire Method
 |
View all Whirlpool WDF550SAAB manuals
Add to My Manuals
Save this manual to your list of manuals |
Page 11 highlights
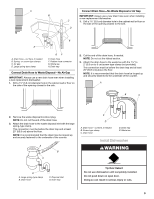
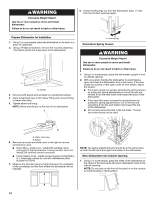
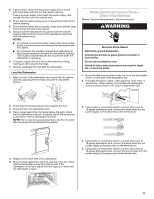
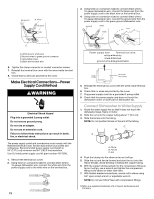
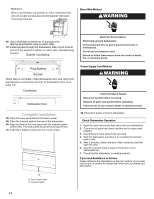
2. If direct wired, check that the power supply wire is on the right-hand side at the front of the cabinet opening. If using a power supply cord, insert the power supply cord through the hole cut in the cabinet wall. 3. Check that the water supply line is on the left-hand side of the cabinet opening. 4. Check that the drain hose is near the center and insert the drain hose through the hole in the cabinet . 5. Slowly move the dishwasher into place inside the cabinet opening with the front corners of the dishwasher door flush with the cabinet doors. NOTES: ■ Do not kink or pinch the copper tubing, drain hose, power supply cord or the direct wire between the dishwasher and the cabinet. ■ Do not remove the insulation blanket from dishwasher to allow the dishwasher to fit easier into the cabinet opening. The insulation blanket reduces the sound level when the dishwasher is operating. 6. If needed, support the front of the dishwasher by raising, lowering or shimming the front legs. 7. Remove cardboard from beneath the dishwasher. Level the Dishwasher 1. Align the front of the dishwasher door panel with the cabinet doors by adjusting the front legs using the 6" adjustable wrench. Make Electrical Connections- Direct Wire Method Review "Electrical Requirements" before continuing. WARNING Electrical Shock Hazard Electrically ground dishwasher. Connect ground wire to green ground connector in terminal box. Do not use an extension cord. Failure to follow these instructions can result in death, fire, or electrical shock. 1. Route the direct wire so that it does not touch the dishwasher motor or lower part of the dishwasher tub. 2. Pull cable through UL listed / CSA approved strain relief in erminal box. Strain relief is not provided with dishwasher. Owner must purchase a 7/8" screw-in type strain relief. 2. Check that the leveling legs are firmly against the floor. 3. Close and latch the dishwasher door. 4. Place a level against the front panel above the leg to check that the dishwasher is plumb. If needed, adjust the leveling leg or add shims until the dishwasher is plumb. NOTE: Shims must be securely attached to the floor to avoid their movement during dishwasher operation. 3. Using twist-on connectors sized to connect direct wire to 16-gauge dishwasher wire, connect the white wire from the power supply to the white wire on the terminal box. 5. Repeat for the other side of the dishwasher. 6. Place the level against the top front opening of the tub. Check that the dishwasher is level from side to side. If the dishwasher is not level, adjust the front legs up or down until the dishwasher is level. 4. Using twist-on connectors sized to connect direct wire to 16-gauge dishwasher wire, connect the black wire from the power supply to the black wire on the terminal box. 5. Using twist-on connectors sized to connect direct wire to 16-gauge dishwasher wire, connect the ground wires from the power supply to the green ground dishwasher wire. 11
-
 1
1 -
2
-
3
-
4
-
5
-
 6
6 -
 7
7 -
 8
8 -
 9
9 -
 10
10 -
 11
11 -
 12
12 -
 13
13 -
 14
14 -
 15
15 -
 16
16 -
17
-
18
-
19
-
20
-
21
-
22
-
23
-
24
-
25
-
26
-
27
-
28
-
29
 |
 |