Whirlpool WDF550SAAB Installation Guide - Page 14
Complete Installation
 |
View all Whirlpool WDF550SAAB manuals
Add to My Manuals
Save this manual to your list of manuals |
Page 14 highlights
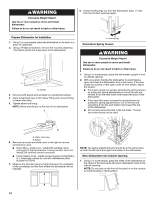
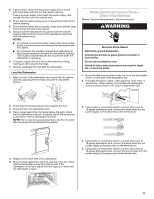
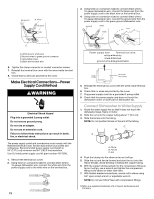
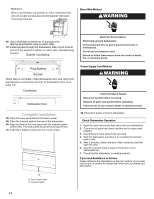
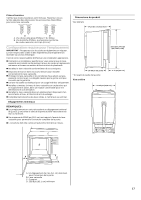
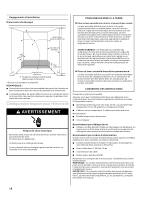
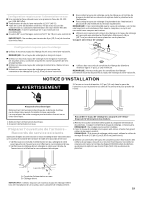
`Method 2 When countertops are granite or other materials that will not accept screws,secure dishwasher with sidemounting brackets. Direct Wire Method WARNING 26. Use a flat-blade screwdriver or prying tool to remove plug buttons (one on each side). 27. Install screws through the dishwasher side mount bracket and into the adjacent cabinet on each side. Reinstall plug buttons. Granite Countertop Electrical Shock Hazard Electrically ground dishwasher. Connect ground wire to green ground connector in terminal box. Do not use an extension cord. Failure to follow these instructions can result in death, fire, or electrical shock. Plug Buttons Screws When step is complete, close dishwasher door and verify that gap between countertop and top of dishwasher door is at least 1/2". Countertop ½'' min. Dishwasher Door Complete Installation 28. Place the lower panel behind the toekick panel. 29. Place the 2 panels against the legs of the dishwasher. 30. Align the slots on the inner panel with the toekick bracket screw holes. The lower panel should be touching the floor. 31. Insert the 4 toekick screws into the 4 screw holes. A Power Supply Cord Method WARNING Electrical Shock Hazard Disconnect power before servicing. Replace all parts and panels before operating. Failure to do so can result in death or electrical shock. 32. Reconnect power or plug in dishwasher. Check Dishwasher Operation 1. Read the User Instructions that came with your dishwasher. 2. Check that all parts have been installed and no steps were skipped. 3. Check that you have all the tools you used. 4. Start the dishwasher and allow it to complete the shortest wash cycle. 5. After 2 minutes, unlatch the door. Wait 5 seconds, and then open the door. 6. Check to see that there is water in the bottom of the dishwasher tub. 7. Check that the dishwasher is working properly. If you need Assistance or Service Please reference the "Assistance or Service" section of your User Instructions or contact the dealer from whom you purchased your dishwasher. B A. Top 4 screw holes B. 2-piece toekick 14
-
 1
1 -
2
-
3
-
4
-
5
-
6
-
7
-
8
-
 9
9 -
 10
10 -
 11
11 -
 12
12 -
 13
13 -
 14
14 -
 15
15 -
 16
16 -
 17
17 -
 18
18 -
 19
19 -
20
-
21
-
22
-
23
-
24
-
25
-
26
-
27
-
28
-
29
 |
 |