Whirlpool WED7500GW W10240504 - Page 6
Key Activation & Encoder Test, Service Test Mode - review
 |
View all Whirlpool WED7500GW manuals
Add to My Manuals
Save this manual to your list of manuals |
Page 6 highlights
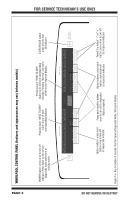
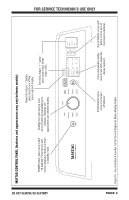
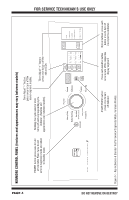
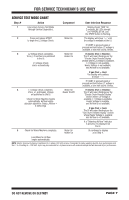
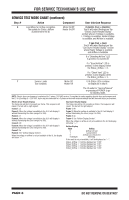
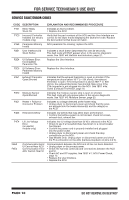
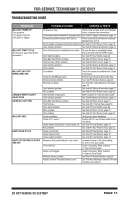
FOR SERVICE TECHNICIAN'S USE ONLY Unsuccessful Activation If entry into diagnostic mode is unsuccessful, refer to the following indications and actions: Indication 1: None of the indicators or display turn on. Action: Select any cycle. If indicators come on, try to change the function for the three buttons used to activate the diagnostic test mode. If any button is unable to change the function, something is faulty with the button, and it will not be possible to enter the diagnostic mode using that button. Replace the user interface and housing assembly. If no indicators come on after selecting the cycle, go to TEST #1, ACU Power Check, page 12. Indication 2: Console indicators begin flashing immediately. Action: If console indicators begin flashing on and off immediately, replace the user interface. Activation with Saved Fault Codes If there is a saved fault code, it will be flashing in the display. Review the Fault/Error Codes table on page 10 for the recommended procedure. If there is no saved fault code, "888" will be displayed. KEY ACTIVATION & ENCODER TEST NOTE: The Service Diagnostic mode must be activated before entering the Key Activation & Encoder Test; see procedure on page 5. Active Fault Code Display in Key Activation & Encoder Test If the display begins flashing while in the Key Activation & Encoder Test, it is displaying an active fault code. Active fault codes are codes that are currently detected. Only one active fault code can be displayed at a time. Entry Procedure Press and release the 1st button used to activate Service Diagnostic mode. The following test will be available: DIAGNOSTIC: Key Activation & Encoder Test Pressing each button will turn off its corresponding indicator(s) or display segment and sound a beep (see figures 1a, 1b, or 1c, pages 2-4). Rotating the cycle selector knob (on some models) turns off each corresponding cycle indicator. NOTE: A second press of the POWER button while in Key Activation & Encoder Test mode exits the Service Diagnostic mode and returns the dryer to standby mode. If indicators do not turn off and beep after pressing buttons and rotating the cycle selector knob (on some models), go to TEST #6: Buttons and Indicators, page 21. Exit Procedure To exit Key Activation & Encoder Test, press the POWER button once or twice (depending on diagnostic procedure) or press and hold the first button used to activate Service Diagnostic mode. SERVICE TEST MODE NOTE: The Service Diagnostic mode must be activated before entering Service Test Mode; see procedure on page 5. NOTE: If, at any point, the user presses the POWER button or opens the door during Service Test Mode, the dryer exits to standby mode. NOTE: Door must be closed to perform test. Dryer must be cool before test to run correctly. Active Fault Code Display in Service Test Mode If the display begins flashing while in Service Test Mode, it is displaying an active fault code. Active fault codes are codes that are currently detected. Only one active fault code can be displayed at a time. Entry Procedure To enter Service Test Mode, press and release the 2nd button used to activate the Service Diagnostic mode. All LEDs (except for POWER) turn off, "888" is displayed for 2 seconds, and the START button begins to flash. PERFORM ALL TESTS: Press and release the START button to run ALL tests indicated in the chart on pages 7 and 8. VOLTAGE TEST: Press and hold the START button for 5 seconds after step 3 to run only the voltage test. Exit Procedure When the test is complete, press the POWER button to exit Service Test Mode and return to standby mode. PAGE 6 DO NOT REMOVE OR DESTROY
-
 1
1 -
 2
2 -
 3
3 -
 4
4 -
 5
5 -
 6
6 -
 7
7 -
 8
8 -
 9
9 -
 10
10 -
 11
11 -
 12
12 -
13
-
14
-
15
-
16
-
17
-
18
-
19
-
20
-
21
-
22
-
23
-
24
-
25
-
26
-
27
-
28
-
29
-
30
-
31
-
32
-
33
-
34
-
35
-
36
-
37
-
38
-
39
-
40
-
41
-
42
-
43
-
44
-
45
-
46
-
47
-
48
-
49
-
50
-
51
-
52
-
53
-
54
-
55
-
56
 |
 |