Whirlpool WFE975H0HZ Owners Manual - Page 5
Feature Guide
 |
View all Whirlpool WFE975H0HZ manuals
Add to My Manuals
Save this manual to your list of manuals |
Page 5 highlights
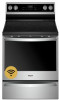
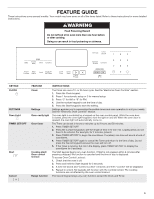
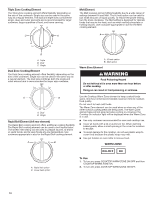
FEATURE GUIDE These instructions cover several models. Your model may have some or all of the items listed. Refer to these instructions for more detailed instructions. WARNING Food Poisoning Hazard Do not let food sit in oven more than one hour before or after cooking. Doing so can result in food poisoning or sickness. KEYPAD CLOCK SETTINGS Oven Light TIMER SET/OFF Start Cancel FEATURE Clock Settings Oven cavity light Oven timer Cooking start/ Oven control lockout Range function INSTRUCTIONS The Clock can use a 12- or 24-hour cycle. See the "Electronic Oven Controls" section. 1. Press the Clock keypad. 2. Press 1 for automatic setup or 2 for manual setup. 3. Press "3" for AM or "6" for PM. 4. Use the number keypad to set the time of day. 5. Press the Start keypad to save the setting. Settings enables you to personalize the audible tones and oven operation to suit your needs. See the "Electronic Oven Controls" section. The oven light is controlled by a keypad on the oven control panel. While the oven door is closed, press the oven light keypad to turn the light on and off. When the oven door is opened, the oven light will automatically come on. The Timer can be set in hours or minutes up to 9 hours and 59 minutes. 1. Press TIMER SET/OFF. 2. Press the number keypads to set the length of time in hr-min-min. Leading zeros do not have to be entered. For example, for 2 minutes, press 2. 3. Press TIMER SET/OFF to begin the countdown. If enabled, one tone will sound at end of countdown. 4. Press TIMER SET/OFF again to cancel the Timer and return to the time of day. Do not press the Cancel keypad because the oven will turn off. 5. If the Timer is running, but not in the display, press TIMER SET/OFF to display the countdown for 5 seconds. The Start keypad begins any oven function. If Start is not pressed within 2 minutes after pressing a keypad, the function is canceled and the time of day is displayed. To access Oven Control Lockout: 1. Check that the oven is off. 2. Press and hold the Start keypad for 3 seconds. 3. A tone will sound and "Control Locked" will scroll, and then "Locked" will be displayed. 4. Repeat to unlock. No keypads will function with the controls locked. The cooktop functions are not affected by the oven control lockout. The Cancel keypad stops any oven function except the Clock and Timer. 5
-
 1
1 -
 2
2 -
 3
3 -
 4
4 -
 5
5 -
 6
6 -
 7
7 -
 8
8 -
 9
9 -
 10
10 -
 11
11 -
12
-
13
-
14
-
15
-
16
-
17
-
18
-
19
-
20
-
21
-
22
-
23
-
24
-
25
-
26
-
27
-
28
-
29
-
30
-
31
-
32
-
33
-
34
-
35
-
36
-
37
-
38
-
39
-
40
-
41
-
42
-
43
-
44
-
45
-
46
-
47
-
48
-
49
-
50
-
51
-
52
-
53
-
54
-
55
-
56
-
57
-
58
-
59
-
60
-
61
-
62
-
63
-
64
 |
 |
