Whirlpool WFW862CHC Owners Manual - Page 24
If you experience, Possible Causes, Solution, Water Leaks cont., Washer Not Performing As Expected
 |
View all Whirlpool WFW862CHC manuals
Add to My Manuals
Save this manual to your list of manuals |
Page 24 highlights
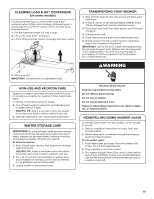
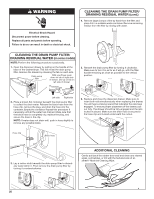
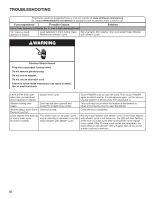
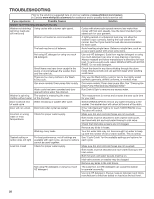
TROUBLESHOOTING First try the solutions suggested here or visit our website at www.whirlpool.com/owners (in Canada www.whirlpool.ca/owners) for assistance and to possibly avoid a service call. If you experience Water Leaks (cont.) Water or suds leaking from door or rear of cabinet Possible Causes Not using HE detergent or using too much HE detergent. Using thickened, easy-pour, or no-splash bleach when running the Clean Washer with affresh® cycle. Residue on door window. Solution Only use HE detergent. Suds from regular detergents can cause leaking from the door or rear of cabinet. Always measure detergent and follow manufacturer's directions based on your load requirements. Use affresh® tablet or regular, non-thickened chlorine bleach when running the Clean Washer with affresh® cycle. Periodically clean the underside of the window to avoid potential leaks. Door opened during "Add Garment." Water can drip off the inside of the door when the door is opened after the start of a cycle. Leaking around door Hair, lint, or other debris on inner Clean inner door window and seal. See "Cleaning the Door Seal" door window preventing proper seal in the "Washer Maintenance" section. with rubber door seal. Washer Not Performing As Expected Load not completely covered in water Water level not visible on door or does not cover clothes. This is normal for an HE front-load washer. The washer senses load sizes and adds the correct amount of water for optimal cleaning. Washer won't run or fill; washer stops working Check for proper water supply. Both hoses must be attached and have water flowing to the inlet valve. Both hot and cold water faucets must be turned on. Check that inlet valve screens have not become clogged. Check for any kinks in inlet hoses, which can restrict water flow. Washer won't run or fill; washer stops working (cont.) Check proper electrical supply. Plug power cord into a grounded 3 prong outlet. Do not use an extension cord. Ensure there is power to outlet. Do not plug into a GFCI (Ground Fault Circuit Interrupter). Check electrical source or call an electrician to check if voltage is low. Reset a tripped circuit breaker. Replace any blown fuses. NOTE: If problems continue, contact an electrician. 24
-
 1
1 -
2
-
3
-
4
-
5
-
6
-
7
-
8
-
9
-
10
-
11
-
12
-
13
-
14
-
15
-
16
-
17
-
18
-
 19
19 -
 20
20 -
 21
21 -
 22
22 -
 23
23 -
 24
24 -
 25
25 -
 26
26 -
 27
27 -
 28
28 -
 29
29 -
30
-
31
-
32
-
33
-
34
-
35
-
36
-
37
-
38
-
39
-
40
-
41
-
42
-
43
-
44
-
45
-
46
-
47
-
48
-
49
-
50
-
51
-
52
-
53
-
54
-
55
-
56
-
57
-
58
-
59
-
60
-
61
-
62
-
63
-
64
-
65
-
66
-
67
-
68
-
69
-
70
-
71
 |
 |