Whirlpool WFW9300VU Use and Care Guide - Page 13
Status Lights, Cycles
 |
UPC - 883049141800
View all Whirlpool WFW9300VU manuals
Add to My Manuals
Save this manual to your list of manuals |
Page 13 highlights
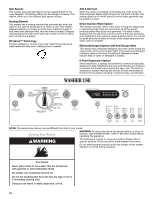
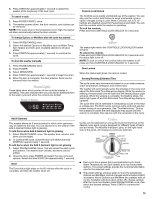
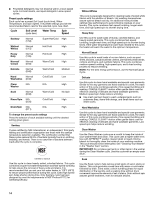
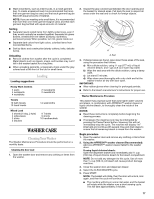
5. Press START (for approximately 1 second) to restart the washer at the beginning of the new cycle. To cancel a cycle 1. Press PAUSE/CANCEL twice. 2. The washer powers down, the door unlocks, and clothes can be removed. NOTE: If the water level or the temperature is too high, the washer will drain automatically before the door unlocks. To change Options or Modifiers after the cycle has started 1. Press PAUSE/CANCEL once. 2. Select the desired Options or Modifiers such as Water Temp, Spin Speed, and Soil Level. Available selections will glow amber. 3. Press START (for approximately 1 second) to continue the cycle. To drain the washer manually 1. Press PAUSE/CANCEL twice. 2. Press POWER. 3. Select DRAIN/SPIN. 4. Press START (for approximately 1 second) to begin the drain. 5. When the spin is complete, the door unlocks. Items can be removed from the washer. Status Lights These lights show which portion of the cycle the washer is operating. They also indicate when you can add an additional item to the wash cycle and when the controls are locked. Add A Garment This washer allows an 8-minute period in which other garments may be added to the load. You can add items to the washer if the Add A Garment status light is glowing. To add items when Add A Garment light is glowing 1. Select PAUSE/CANCEL once. The washer door unlocks, and items can be added. 2. To continue the cycle, close the door and select and hold START (for approximately 1 second). To add items when the Add A Garment light is not glowing 1. Select PAUSE/CANCEL twice. This will cancel the wash cycle and options. The washer door unlocks, and items can be added. 2. Close the door, press POWER and select the new cycle and options. Select and hold START (for approximately 1 second). Done The Done status light stays on for 60 minutes after the cycle is complete, and then the washer shuts off. Controls Lock/Unlock The Controls Lock avoids unintended use of the washer. You can also use the control lock feature to avoid unintended cycle or option changes during a cycle. When Controls Lock is lit, all buttons are disabled except for Pause/Cancel and Start. You can lock the controls while the washer is operating. To lock the controls Press and hold CONTROLS LOCK/UNLOCK for 3 seconds. The status light next to the CONTROLS LOCK/UNLOCK button will glow. To unlock the controls Press and hold CONTROLS LOCK/UNLOCK for 3 seconds until the status light turns off. NOTE: To lock or unlock the controls when the washer is off, press and hold CONTROLS LOCK/UNLOCK for 3 seconds. Door Locked When the status light glows, the door is locked. Sensing/Revising Estimated Time The cycle times vary automatically based on your water pressure, water temperature, detergent, and clothes load. The washer will automatically sense the progress in the cycle and adjust the Estimated Time Remaining display. While the washer is sensing, the estimated time will flash and the Sensing Status Light will glow. When the sensing is complete, the flashing stops, the status light goes off and the Estimated Time Remaining display is updated. The cycle time will be extended if oversudsing occurs or the load is unbalanced. The SUD routine removes extra suds and assures proper rinsing of your garments. See "Troubleshooting." During the unbalance routine the time displayed may pause until this activity is complete, then resume with the remainder of the cycle. Cycles Cycles can be selected by turning the Cycle Control knob to the desired cycle. Each cycle is designed for different types of fabric and soil levels. The Modifier Indicator Lights, on the right-hand side of the panel, will change as cycles are selected. ■ Each cycle has a preset Soil Level (estimated cycle time), Water Temperature, and Spin Speed, and may have preset options. The preset settings provide the recommended fabric care for the selected cycle. ■ The preset settings will glow green to show the preselected Options and Modifiers, and be changed anytime before START is pressed. Not all Options and Modifiers are available with all cycles. Available selections glow amber. (To change settings after the cycle has started, press PAUSE/CANCEL once, then select the desired settings. Press START to continue the cycle.) 13
-
 1
1 -
2
-
3
-
4
-
5
-
6
-
7
-
 8
8 -
 9
9 -
 10
10 -
 11
11 -
 12
12 -
 13
13 -
 14
14 -
 15
15 -
 16
16 -
 17
17 -
 18
18 -
19
-
20
-
21
-
22
-
23
-
24
-
25
-
26
-
27
-
28
-
29
-
30
-
31
-
32
-
33
-
34
-
35
-
36
-
37
-
38
-
39
-
40
-
41
-
42
-
43
-
44
-
45
-
46
-
47
-
48
 |
 |
