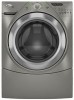
Whirlpool WFW9300VU Use and Care Guide - Page 18
Swarning
 |
UPC - 883049141800
View all Whirlpool WFW9300VU manuals
Add to My Manuals
Save this manual to your list of manuals |
Page 18 highlights
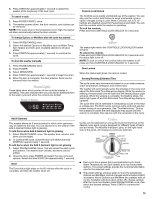
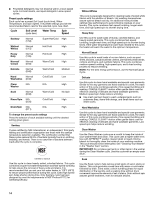
6. The cycle will determine whether clothing or other items are in the washer. a) If no items are detected in the washer, it will proceed to Step 7. b) If any items are detected in the washer, "rL" (remove load) will be displayed, and the WASH and CONTROL LOCK lights will remain lit. The door will unlock. Open and remove any garments in the wash drum. ■ Press PAUSE/CANCEL to cancel the failure code. Then repeat steps 3, 4, and 5 to start the cycle again. 7. Once the cycle has begun, allow the cycle to complete. 8. After the cycle is complete, leave the door open slightly, to allow for better ventilation and drying of washer interior. Always do the following to maintain washer freshness ■ Use only HE High Efficiency detergent. ■ Leave the door slightly open after each cycle to allow for better ventilation and drying of washer interior. ■ Repeat the cleaning procedure monthly, using one AFFRESH™ tablet or 2/3 cup (160 mL) of liquid chlorine bleach. ■ If the procedure does not sufficiently improve the machine freshness, evaluate your installation and usage conditions for other causes. Cleaning the exterior Use a soft damp cloth or sponge to wipe up any spills. Occasionally wipe the outside of your washer to keep it looking new. Use mild soap and water. Do not use abrasive products. Cleaning the dispenser drawer The dispenser drawer is removable for easy cleaning. 1. Unlock the dispenser drawer by pressing the Release Lever in the Prewash compartment. See "Using the Dispenser." Remove the drawer. 2. Remove the inserts (the siphon from the softener and bleach compartments and the detergent selector). 3. Wash the parts under running water. 4. Replace the inserts and return the dispenser to the drawer. Water Inlet Hoses Replace inlet hoses after 5 years of use to reduce the risk of hose failure. Periodically inspect and replace inlet hoses if bulges, kinks, cuts, wear, or leaks are found. When replacing your inlet hoses, record the date of replacement. Vacation, Storage, and Moving Care Install and store your washer where it will not freeze. Because some water may stay in the hoses, freezing can damage your washer. If storing or moving your washer during freezing weather, winterize it. Non-use or vacation care: Operate your washer only when you are at home. If you will be on vacation or not using your washer for an extended period of time, you should: ■ Unplug washer or disconnect power. ■ Turn off the water supply to the washer. This helps avoid unintended flooding (due to a water pressure surge) while you are away. ■ Slightly open door to provide ventilation. To winterize washer: 1. Put 1 qt (1 L) of R.V.-type antifreeze in the drum. 2. Run washer on a Drain/Spin cycle. 18 3. Unplug washer or disconnect power. 4. Shut off both water faucets. 5. Disconnect water inlet hoses from faucets and drain. To use washer again: 1. Flush water pipes. Reconnect water inlet hoses to faucets. Turn on both water faucets. WARNING Electrical Shock Hazard Plug into a grounded 3 prong outlet. Do not remove ground prong. Do not use an adapter. Do not use an extension cord. Failure to follow these instructions can result in death, fire, or electrical shock. 2. Plug in washer or reconnect power. 3. Run the washer through the Normal/Casual cycle with 1/2 the manufacturer's recommended amount of HE detergent for a medium-size load, to clean the washer and remove the antifreeze, if used. To transport the washer: 1. If washer will be moved during freezing weather, put in 1 qt (1 L) of R.V.-type antifreeze in the drum. Run washer on a Drain/Spin cycle. 2. Unplug the power cord. 3. Disconnect the drain hose from the drain system and attach to rear panel clips. 4. Shut off both water faucets. 5. Disconnect the water inlet hoses from faucets, then drain the hoses, and clip them to the rear panel of the washer. IMPORTANT: Call for service. Do not reuse transport bolts. Washer must be transported in the upright position. To avoid suspension and structural damage to your washer, it must be properly set up for relocation by a certified technician. Reinstalling the washer 1. Follow the "Installation Instructions" to locate, level and connect the washer. 2. Run the washer through the Normal/Casual cycle with 1/2 the manufacturer's recommended amount of HE detergent for a medium-size load, to clean the washer and remove the antifreeze, if used.
-
 1
1 -
2
-
3
-
4
-
5
-
6
-
7
-
8
-
9
-
10
-
11
-
12
-
 13
13 -
 14
14 -
 15
15 -
 16
16 -
 17
17 -
 18
18 -
 19
19 -
 20
20 -
 21
21 -
 22
22 -
 23
23 -
24
-
25
-
26
-
27
-
28
-
29
-
30
-
31
-
32
-
33
-
34
-
35
-
36
-
37
-
38
-
39
-
40
-
41
-
42
-
43
-
44
-
45
-
46
-
47
-
48
 |
 |
