Whirlpool WTW5100VQ Installation Instructions - Page 5
Straight power cord, Looped power cord
 |
UPC - 883049145143
View all Whirlpool WTW5100VQ manuals
Add to My Manuals
Save this manual to your list of manuals |
Page 5 highlights
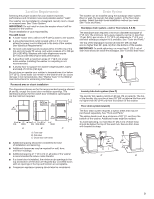
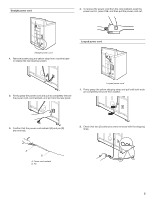
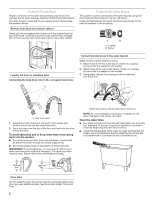
Straight power cord 4. To remove the power cord from the cord restraint, push the power cord in, press TAB, and then pull the power cord out. Straight power cord 1. Remove power plug and yellow strap from machine base to release the rear leveling system. Looped power cord 2. Firmly grasp the power cord and pull to completely remove the power cord, cord restraint, and pin from the rear panel. Looped power cord 1. Firmly grasp the yellow shipping strap and pull until both ends are completely removed from washer. 3. Con rm that the power cord restraint (A) and pin (B) are removed. 2. Check that two (2) cotter pins were removed with the shipping strap. A B A. Power cord restraint B. Pin 5
-
 1
1 -
 2
2 -
 3
3 -
 4
4 -
 5
5 -
 6
6 -
 7
7 -
 8
8 -
 9
9 -
 10
10 -
 11
11 -
12
-
13
-
14
-
15
-
16
 |
 |

Straight power cord
1.
Remove power plug and yellow strap from machine base
to release the rear leveling system.
2.
Firmly grasp the power cord and pull to completely remove
the power cord, cord restraint, and pin from the rear panel.
3.
Con±rm that the power cord restraint (A) and pin (B)
are removed.
4.
To remove the power cord from the cord restraint, push the
power cord in, press TAB, and then pull the power cord out.
Looped power cord
1.
Firmly grasp the yellow shipping strap and pull until both ends
are completely removed from washer.
2.
Check that two (2) cotter pins were removed with the shipping
strap.
Straight power cord
A. Power cord restraint
B. Pin
A
B
Looped power cord
5