Whirlpool WVI75UC6DS Use & Care Guide - Page 8
Assemble Range Hood, Install Range Hood
 |
View all Whirlpool WVI75UC6DS manuals
Add to My Manuals
Save this manual to your list of manuals |
Page 8 highlights
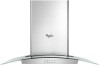
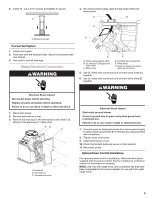
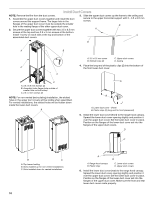
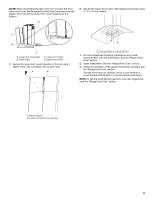
Install In-Line Smart Kit - Optional NOTE: Your range hood can work with either an internal or an inline (external) blower motor system. An optional In-Line Smart Kit (purchased separately) allows the blower motor that comes with this range hood to be installed in a location other than inside the range hood cavity. CAUTION: To reduce the risk of fire and electric shock, install this range hood only with the In-Line Smart Kit manufactured by Whirlpool, Part Number W10692945. For installation see the In-Line Smart Kit installation instructions. See the "Assistance or Service" section to order. Assemble Range Hood 1. Install transition on top of hood (if removed for shipping) with 2 - 3.5 x 9.5 mm sheet metal screws. A B 4. Attach a second set of vertical supports (A) and set the vertical height (B). See "Installation Dimensions" in the "Location Requirements" section to help determine the desired dimension for vertical height "B." Secure with 16 - 4.2 x 8 mm T20® screws. A A B A. Vertical supports B. Vertical height Install Range Hood Non-Vented (recirculating) Installation 1. Attach the air deflector to the upper horizontal support using 4 mounting screws. B A. Vent transition B. 3.5 x 9.5 mm screw 2. Position the 4 vertical supports (A) with the notches at the bottom and attach to the range hood using 16 - 4.2 x 8 mm screws. 3. Attach the horizontal support (B) using 8 - 4.2 x 8 mm screws. B A A C C A. Vertical supports B. Horizontal support C. Notched end A B A. Deflector B. Mounting screws 2. Measure the length of 6" (15.2 cm) duct needed to connect the transition to the deflector. NOTE: Vent should fit up inside the deflector 1" (2.5 cm) minimum. 3. Install vent between the transition and the deflector. NOTE: To make vent installation easier, temporarily remove the deflector from the chimney support bracket and replace after vent section is in place. 4. Seal all connections with vent clamps. Continue with "Range Hood Installation" in this section. Range Hood Installation 1. Using 2 or more people, lift the range hood assembly and attach it by snapping the vertical supports to the spring clips in the upper horizontal support bracket that is mounted to the ceiling. NOTE: The range hood assembly must be held in place while you are installing the screws in the next step. 8
-
 1
1 -
2
-
 3
3 -
 4
4 -
 5
5 -
 6
6 -
 7
7 -
 8
8 -
 9
9 -
 10
10 -
 11
11 -
 12
12 -
 13
13 -
14
-
15
-
16
-
17
-
18
-
19
-
20
-
21
-
22
-
23
-
24
-
25
-
26
-
27
-
28
-
29
-
30
-
31
-
32
 |
 |