Xerox 3210/N User Guide - Page 67
Cleaning the drum, Clearing the Toner Empty message, Maintenance parts, Checking replaceables
 |
View all Xerox 3210/N manuals
Add to My Manuals
Save this manual to your list of manuals |
Page 67 highlights
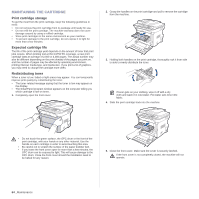
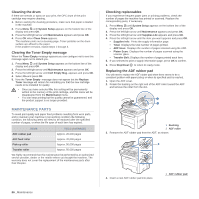
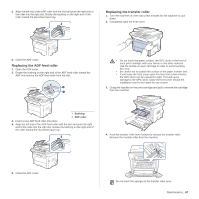
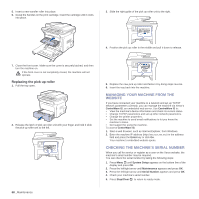
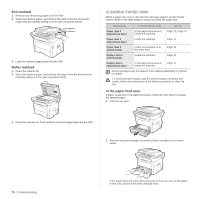
Cleaning the drum If there are streaks or spots on your print, the OPC drum of the print cartridge may require cleaning. 1. Before starting the cleaning procedure, make sure that paper is loaded in the machine. 2. Press Menu until System Setup appears on the bottom line of the display and press OK. 3. Press the left/right arrow until Maintenance appears and press OK. 4. Press OK when Clean Drum appears. The machine prints out a cleaning page. Toner particles on the drum surface are affixed to the paper. If the problem remains, repeat steps 1 through 4. Clearing the Toner Empty message When the Toner Empty message appears you can configure not to see this message again not to disturb you. 1. Press Menu until System Setup appears on the bottom line of the display and press OK. 2. Press the left/right arrow until Maintenance appears and press OK. 3. Press the left/right arrow until CLR Empty Msg. appears and press OK. 4. Select On and press OK. 5. Now the Toner Empty message does not appear but the Replace Toner message will remain for reminding you that the new cartridge needs to be installed for quality. • Once you have selected On, this setting will be permanently written to the memory of the print cartridge, and this menu will be disappeared from the Maintenance menu. • You can keep printing but the quality cannot be guaranteed, and the product support is no longer provided. MAINTENANCE PARTS To avoid print quality and paper feed problems resulting from worn parts, and to maintain your machine in top working condition the following condition, the following items will need to be replaced after the specified number of pages, or when the life span of each item has expired. ITEMS YIELD (AVERAGE) ADF rubber pad Approx. 20,000 pages ADF feed roller Approx. 20,000 pages Pick-up roller Approx. 50,000 pages Transfer roller Approx. 50,000 pages We highly recommend that this maintenance be performed by an authorized service provider, dealer or the retailer where you bought the machine. The warranty does not cover the replacement of the maintenance parts after their lifespan. Checking replaceables If you experience frequent paper jams or printing problems, check the number of pages the machine has printed or scanned. Replace the corresponding parts, if necessary. 1. Press Menu until System Setup appears on the bottom line of the display and press OK. 2. Press the left/right arrow until Maintenance appears and press OK. 3. Press the left/right arrow until Supplies Life appears and press OK. 4. Press the left/right arrow until the item you want appears and press OK. • Supplies Info: Prints the supply information page. • Total: Displays the total number of pages printed. • ADF Scan: Displays the number of pages scanned using the ADF. • Platen Scan: Displays the number of pages scanned using the scanner glass. • Transfer Belt: Displays the number of pages printed each item. 5. If you selected to print a supply information page, press OK to confirm. 6. Press Stop/Clear to return to ready mode. Replacing the ADF rubber pad You will need to replace the ADF rubber pad when there seems to be a consistent problem with paper pickup or when its specified yield is reached. 1. Open the ADF cover. 2. Rotate the bushing on the right end of the ADF roller toward the ADF and remove the roller from the slot. 1 Bushing 2 ADF roller 3. Remove the ADF rubber pad from the ADF, as shown. 4. Insert a new ADF rubber pad into place. 1 ADF rubber pad 66 _Maintenance
-
 1
1 -
2
-
3
-
4
-
5
-
6
-
7
-
8
-
9
-
10
-
11
-
12
-
13
-
14
-
15
-
16
-
17
-
18
-
19
-
20
-
21
-
22
-
23
-
24
-
25
-
26
-
27
-
28
-
29
-
30
-
31
-
32
-
33
-
34
-
35
-
36
-
37
-
38
-
39
-
40
-
41
-
42
-
43
-
44
-
45
-
46
-
47
-
48
-
49
-
50
-
51
-
52
-
53
-
54
-
55
-
56
-
57
-
58
-
59
-
60
-
61
-
 62
62 -
 63
63 -
 64
64 -
 65
65 -
 66
66 -
 67
67 -
 68
68 -
 69
69 -
 70
70 -
 71
71 -
 72
72 -
73
-
74
-
75
-
76
-
77
-
78
-
79
-
80
-
81
-
82
-
83
-
84
-
85
-
86
-
87
-
88
-
89
-
90
-
91
-
92
-
93
-
94
-
95
-
96
-
97
-
98
-
99
-
100
-
101
-
102
-
103
-
104
-
105
-
106
-
107
-
108
-
109
-
110
-
111
-
112
-
113
-
114
-
115
-
116
-
117
-
118
-
119
-
120
-
121
-
122
-
123
-
124
-
125
-
126
-
127
-
128
-
129
-
130
-
131
-
132
-
133
-
134
-
135
-
136
-
137
-
138
-
139
-
140
 |
 |
