Xerox 6280DN User Guide - Page 40
Windows 2000 or Later, Set Printer As Default - drivers
 |
UPC - 095205747119
View all Xerox 6280DN manuals
Add to My Manuals
Save this manual to your list of manuals |
Page 40 highlights
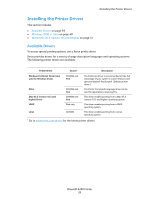
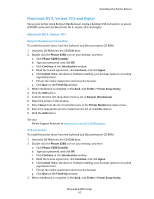
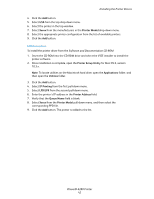
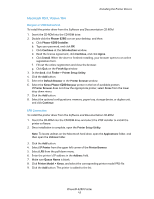
Installing the Printer Drivers Windows 2000 or Later To install the printer driver from the Software and Documentation CD-ROM: 1. Insert the CD-ROM into the computer's CD-ROM drive. If the installer does not launch, do the following: a. Click Start, and then click Run. b. In the Run window, type: :\SETUP.EXE. 2. Click the Language button, select your language, and click OK. 3. Select Install Printer Driver. 4. Click I Agree to accept the license agreement, and show the Xerox Print Driver Installation window. 5. Select the Phaser 6280 driver and click Install to show the Installation Options window. 6. Select either PostScript and/or PCL 6 and click OK. 7. Click Install to start the installation. 8. When the installation is complete, select any of the following from the Installation Status window: • Set Printer As Default • Print A Test Page • Share Printer 9. Click Finish. Note: PrintingScout is a separate option from the printer driver. To install PrintingScout, click Install PrintingScout in the Software and Documentation CD-ROM. Then follow the wizard to complete installation. See also: Online Support Assistant at www.xerox.com/office/6280support Phaser® 6280 Printer 40
-
 1
1 -
2
-
3
-
4
-
5
-
6
-
7
-
8
-
9
-
10
-
11
-
12
-
13
-
14
-
15
-
16
-
17
-
18
-
19
-
20
-
21
-
22
-
23
-
24
-
25
-
26
-
27
-
28
-
29
-
30
-
31
-
32
-
33
-
34
-
 35
35 -
 36
36 -
 37
37 -
 38
38 -
 39
39 -
 40
40 -
 41
41 -
 42
42 -
 43
43 -
 44
44 -
 45
45 -
46
-
47
-
48
-
49
-
50
-
51
-
52
-
53
-
54
-
55
-
56
-
57
-
58
-
59
-
60
-
61
-
62
-
63
-
64
-
65
-
66
-
67
-
68
-
69
-
70
-
71
-
72
-
73
-
74
-
75
-
76
-
77
-
78
-
79
-
80
-
81
-
82
-
83
-
84
-
85
-
86
-
87
-
88
-
89
-
90
-
91
-
92
-
93
-
94
-
95
-
96
-
97
-
98
-
99
-
100
-
101
-
102
-
103
-
104
-
105
-
106
-
107
-
108
-
109
-
110
-
111
-
112
-
113
-
114
-
115
-
116
-
117
-
118
-
119
-
120
-
121
-
122
-
123
-
124
-
125
-
126
-
127
-
128
-
129
-
130
-
131
-
132
-
133
-
134
-
135
-
136
-
137
-
138
-
139
-
140
-
141
-
142
-
143
-
144
-
145
-
146
-
147
-
148
-
149
-
150
-
151
-
152
-
153
-
154
-
155
-
156
-
157
-
158
 |
 |