Xerox XD125F User Guide - Page 45
Fuser Area, Warning, paper is not seen in this area skip to the, Exit Area., Caution - e2
 |
UPC - 095205012576
View all Xerox XD125F manuals
Add to My Manuals
Save this manual to your list of manuals |
Page 45 highlights
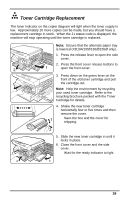
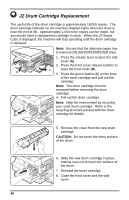
- E2 Clearing the Paper Path (continued) Fuser Area Warning: The fuser area is hot. Take care when removing paper from the fuser area. Note: Ensure that the alternate paper tray is lowered (XD104 105f/ 130df/ 155df only). 1. Press the release lever to open the side cover. 2. Pull down on the fuser lever. • This will release pressure on the paper. paper is not seen in this area skip to the Exit Area. Caution: Do not pull paper up through the fusing unit. Unfused toner may adhere in the area, resulting in smudged copies. 3. Remove the sheet of paper, in the direction shown. 4. Push up on the fuser lever. 5. Close the side cover. 37
-
 1
1 -
2
-
3
-
4
-
5
-
6
-
7
-
8
-
9
-
10
-
11
-
12
-
13
-
14
-
15
-
16
-
17
-
18
-
19
-
20
-
21
-
22
-
23
-
24
-
25
-
26
-
27
-
28
-
29
-
30
-
31
-
32
-
33
-
34
-
35
-
36
-
37
-
38
-
39
-
 40
40 -
 41
41 -
 42
42 -
 43
43 -
 44
44 -
 45
45 -
 46
46 -
 47
47 -
 48
48 -
 49
49 -
 50
50 -
51
-
52
-
53
-
54
-
55
-
56
-
57
-
58
-
59
-
60
-
61
-
62
-
63
 |
 |

37
– E2 Clearing the Paper Path
(continued)
Fuser Area
Warning:
The fuser area is hot.
Take
care when removing paper from the fuser
area.
Note:
Ensure that the alternate paper tray
is lowered (XD104 105f/ 130df/ 155df
only).
1.
Press the release lever to open the side
cover.
2.
Pull down on the fuser lever.
•
This will release pressure on the
paper.
paper is not seen in this area skip to the
Exit Area.
Caution:
Do not pull paper up through the
fusing unit.
Unfused toner may adhere
in the area, resulting in smudged
copies.
3.
Remove the sheet of paper, in the
direction shown.
4.
Push up on the fuser lever.
5.
Close the side cover.