Xerox XD125F User Guide - Page 51
Installation for Windows 3.1x, or 95/98 - driver
 |
UPC - 095205012576
View all Xerox XD125F manuals
Add to My Manuals
Save this manual to your list of manuals |
Page 51 highlights
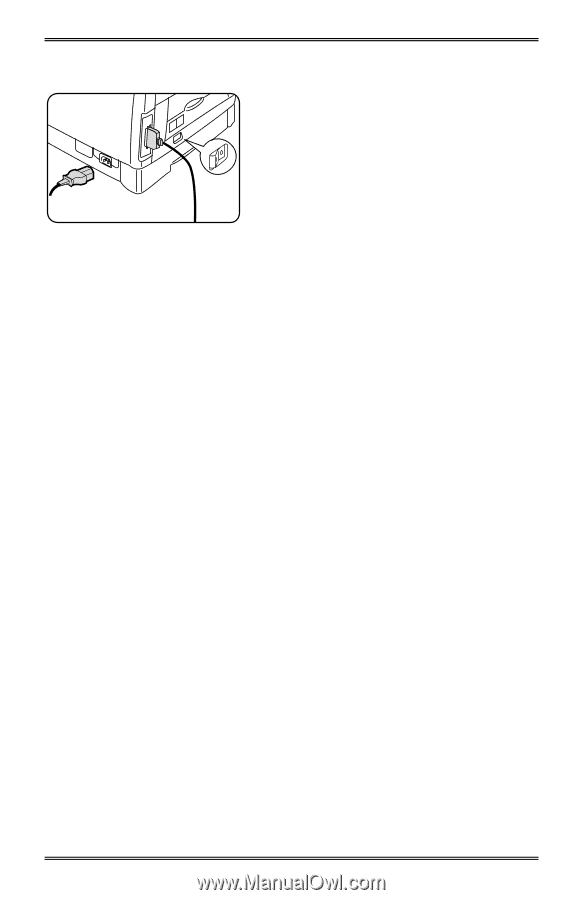
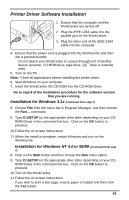
Printer Driver Software Installation 1. Ensure that the computer and the WorkCentre are turned off. 2. Plug the IEEE-1284 cable into the parallel port on the WorkCentre. 3. Plug the other end of the IEEE-1284 cable into the computer. 4. Ensure that the power cord is plugged into the WorkCentre and then into a grounded outlet. • Do not attach your WorkCentre to a pass-through port of another device (scanner, CD-ROM drive, tape drive, Zip™ drive or external disk). 5. Turn on the PC. Note: Close all applications before installing the printer driver. 6. Start Windows on your computer. 7. Insert the WorkCentre XD CD-ROM into the CD-ROM Drive. Go to step 8 of the Installation procedure for the software version that you are running. Installation for Windows 3.1x (continued from step 7) 8. Choose File from the menu bar in Program Manager, and then choose the Run... command. 9. Type D:\SETUP (or the appropriate drive letter depending on your CDROM Drive) in the command line box. Click on the OK button to proceed. 10.Follow the on-screen instructions. 11.When the install is complete, restart Windows and turn on the WorkCentre. Installation for Windows NT 4.0 or 95/98 (continued from step 7) 8. Click on the Start button and then choose the Run menu option. 9. Type D:\SETUP (or the appropriate drive letter depending on your CD- ROM Drive) in the command line box. Click on the OK button to proceed. 10.Turn on the WorkCentre. 11.Follow the on-screen instructions. • If you wish to print a test page, ensure paper is loaded and then click the Yes button. 43
-
 1
1 -
2
-
3
-
4
-
5
-
6
-
7
-
8
-
9
-
10
-
11
-
12
-
13
-
14
-
15
-
16
-
17
-
18
-
19
-
20
-
21
-
22
-
23
-
24
-
25
-
26
-
27
-
28
-
29
-
30
-
31
-
32
-
33
-
34
-
35
-
36
-
37
-
38
-
39
-
40
-
41
-
42
-
43
-
44
-
45
-
 46
46 -
 47
47 -
 48
48 -
 49
49 -
 50
50 -
 51
51 -
 52
52 -
 53
53 -
 54
54 -
 55
55 -
 56
56 -
57
-
58
-
59
-
60
-
61
-
62
-
63
 |
 |