Yamaha 800 Owner's Manual - Page 3

Contents, Preparation - receiver

Page 3 highlights

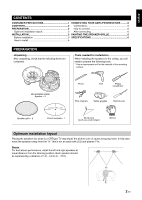
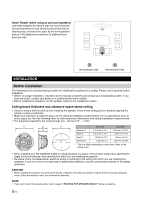
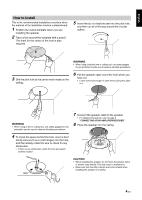
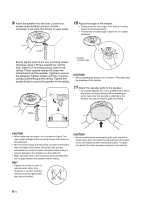
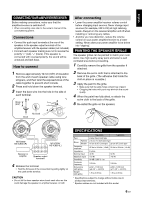
English CONTENTS CONSUMER PRECAUTIONS 1 CONNECTING YOUR AMPLIFIER/RECEIVER .......... 6 CONTENTS 2 Connections 6 PREPARATION 2 How to connect 6 Optimum installation layout 2 After connecting 6 INSTALLATION 3 PAINTING THE SPEAKER GRILLE 6 Before installation 3 SPECIFICATIONS 6 How to install 4 PREPARATION Unpacking After unpacking, check that the following items are contained. Tools needed for installation When installing the speakers to the ceiling, you will need to prepare the following tools. * Use an appropriate tool for the material of the mounting surface. NS-IC600/NS-IC800 Speaker × 2 Pencil Drill Philips screwdriver Wire strippers Safety goggles Keyhole saw Speaker grille × 2 Cutout template × 1 Sturdy wire (such as a coat hanger) Gloves Optimum installation layout Placing the speakers too close to a CRT-type TV may impair the picture color or cause a buzzing noise. In this case, move the speakers away from the TV. This is not an issue with LCD and plasma TVs. Stereo For best stereo performance, install the left and right speakers at equal distance from the listening position. Each speaker should be separated by a distance of 1.8 - 3.0 m (6 - 10 ft). 2 En

  • 1
  • 2
  • 3
  • 4
  • 5
  • 6
  • 7
  • 8

2
En
English
Pl
a
cing the
s
pe
a
ker
s
too clo
s
e to
a
CRT-type TV m
a
y imp
a
ir the picture color or c
a
u
s
e
a
buzzing noi
s
e. In thi
s
c
as
e,
move the
s
pe
a
ker
s
a
w
a
y from the TV. Thi
s
i
s
not
a
n i
ss
ue with LCD
a
nd pl
as
m
a
TV
s
.
Stereo
For be
s
t
s
tereo perform
a
nce, in
s
t
a
ll the left
a
nd right
s
pe
a
ker
s
a
t
equ
a
l di
s
t
a
nce from the li
s
tening po
s
ition. E
a
ch
s
pe
a
ker
s
hould
be
s
ep
a
r
a
ted by
a
di
s
t
a
nce of 1.8 –
3
.0 m (6 – 10 ft).
CONTENTS
CONSUMER PRECAUTIONS
......................................
1
CONTENTS
..................................................................
2
PREPARATION
............................................................
2
Optimum in
s
t
a
ll
a
tion l
a
yout
.......................................
2
INSTALLATION
............................................................
3
Before in
s
t
a
ll
a
tion
....................................................
3
How to in
s
t
a
ll
.............................................................
4
CONNECTING YOUR AMPLIFIER/RECEIVER
..........
6
Connection
s
..............................................................
6
How to connect
.........................................................
6
After connecting
........................................................
6
PAINTING THE SPEAKER GRILLE
............................
6
SPECIFICATIONS
.......................................................
6
PREPARATION
Optimum installation layout
NS-IC600/NS-IC800
Spe
a
ker
×
2
Spe
a
ker grille
×
2
Cutout templ
a
te
×
1
Unpacking
After unp
a
cking, check th
a
t the following item
s
a
re
cont
a
ined.
Tools needed for installation
When in
s
t
a
lling the
s
pe
a
ker
s
to the ceiling, you will
need to prep
a
re the following tool
s
.
*U
s
e
a
n
a
ppropri
a
te tool for the m
a
teri
a
l of the mounting
s
urf
a
ce.
Drill
Philip
s
s
crewdriver
Pencil
S
a
fety goggle
s
Wire
s
tripper
s
Keyhole
sa
w
Glove
s
Sturdy wire
(
s
uch
as
a
co
a
t h
a
nger)