Yamaha AVX-S80 Owner's Manual - Page 16
CONNECTIONS, Connecting TV and audio/video components, components
 |
View all Yamaha AVX-S80 manuals
Add to My Manuals
Save this manual to your list of manuals |
Page 16 highlights
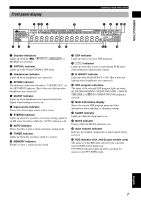
CONNECTIONS Connecting TV and audio/video components I Types of audio jacks Rear panel (U.S.A. model) 75Ω UNBAL. FM ANT GND AM ANT OPTICAL DVD/CD OPTICAL VIDEO 1 DIGITAL AUDIO IN VIDEO 1 IN VCR OUT DVD/CD IN R L VIDEO VCR IN R L VIDEO 1 2 2 Anti-dust cap Remove the cap covering the OPTICAL jack when connecting an optical cable to an OPTICAL jack on the rear panel of this system. Safely store the cap and always re-insert it in the terminal when the terminal is not in use. (This cap prevents the entrance of dust.) Anti-dust cap Front panel I Type of video jacks STANDBY/ON SILENT VIDEO2 PHONES VIDEO L AUDIO R OPTICAL MEMORY AUTO/MAN'L 21 1 OPTICAL (digital) jack Connects an optical cable and provides the better quality sound than analog audio jacks. The cable can be inserted directly into the OPTICAL jack on the front panel. For the OPTICAL jacks on the rear panel, first remove the anti-dust cap from a jack, and then connect the cable to the jack. 2 Analog audio jacks Connect the audio pin cable of an audio/video cable. y • You can use the digital jacks to input PCM, Dolby Digital and DTS bitstreams. • All digital input jacks are acceptable for 96-kHz or lower sampling digital signals. • By connecting to the digital jacks, you can enjoy listening to the multi-channel sound track of a DVD source with sound field effects. Notes • The OPTICAL jacks on this system conform to the EIA standard. If you use an optical cable that does not conform to this standard, this system may not function properly. • Once you have connected a recording component to this system, keep its power turned on while using this system. If the power is off, this system may distort the sound from other components. Rear panel (U.S.A. model) 75Ω UNBAL. FM ANT GND AM ANT OPTICAL DVD/CD OPTICAL VIDEO 1 DIGITAL AUDIO IN Front panel VIDEO 1 IN VCR OUT DVD/CD IN R L VIDEO VCR IN R L VIDEO 1 1 STANDBY/ON SILENT VIDEO2 PHONES VIDEO L AUDIO R OPTICAL MEMORY AUTO/MAN'L 1 1 VIDEO jack Inputs/outputs conventional composite video signal. Note • If you connect this system to a video monitor through a video cassette recorder, the picture may not be played back properly due to the copyright protection technology incorporated in this system. 12
-
 1
1 -
2
-
3
-
4
-
5
-
6
-
7
-
8
-
9
-
10
-
 11
11 -
 12
12 -
 13
13 -
 14
14 -
 15
15 -
 16
16 -
 17
17 -
 18
18 -
 19
19 -
 20
20 -
 21
21 -
22
-
23
-
24
-
25
-
26
-
27
-
28
-
29
-
30
-
31
-
32
-
33
-
34
-
35
-
36
-
37
-
38
-
39
-
40
-
41
-
42
-
43
-
44
-
45
-
46
-
47
-
48
-
49
-
50
-
51
-
52
-
53
-
54
-
55
 |
 |
