Yamaha CDC-755 Owner's Manual - Page 19
Track Programming For Recording To Tape - cd
 |
View all Yamaha CDC-755 manuals
Add to My Manuals
Save this manual to your list of manuals |
Page 19 highlights
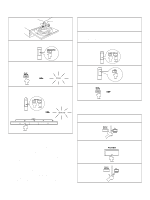
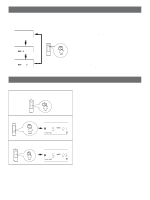
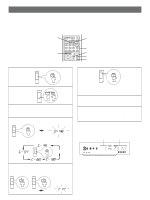
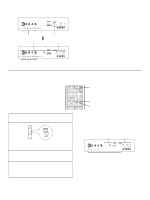
TRACK PROGRAMMING FOR RECORDING TO TAPE This convenient feature can be used to program tracks for recording to tape. By only memorizing the tape's total possible recording time, the unit will automatically program tracks or help you to program tracks so they will fit onto the tape with the least amount of unrecorded space remaining at each end of the tape. s Automatic tape programming This is for recording tracks on a disc so that they best fit onto a tape. 4 2 OPEN/CLOSE DIMMER TIME PROG TAPE REPEAT RANDOM 1 2 3 MODE 4 5 6 +10 7 8 9 0 DISC SKIP SKIP DISC SCAN PAUSE PLAY SEARCH INDEX STOP 6 5 8 7, 8 1 1 Stop the unit. 6 STOP REPEAT 2 Select the disc. DISC SKIP 3 The peak level searching function of this unit is useful for adjusting recording level on the tape deck. (Refer to page 22.) 4 Enter the tape's total possible recording time. TAPE You can select any of four tape lengths by pressing the TAPE button. TAPE (off) 5 Otherwise, you can also enter the tape's total possible recording time manually. Example: For a C-64 tape (32 minutes on each side) 6 4 Œ * By pressing the REPEAT button, the unit automatically programs tracks for side A and side B separately considering the tape's total time. 7 Begin recording on the tape deck and press the PLAY button on this unit at the same time. 8 The unit will pause at the end of side A of the tape. Turn the tape over to side B. Resume recording and, at the same time, press the PLAY or PAUSE button on this unit. Notes q All tracks may not be programmed if the tape's length is not enough. To program all tracks, use a longer tape. q In step 6, you can check the program data for side A and side B. Œ 1 2 3 4 5 PROG TOTAL Ž Œ Shows the number of programmed tracks for each side in turn just after the automatic programming is finished, and then it is replaced by the number of the first programmed track for side A. Shows the total time of programmed tracks for each side. Ž Shows the programmed track numbers for each side. q CD synchronized recording function can be used if your tape deck is compatible with it. In this case, in step 7 and 8, press the SYNCHRO button and then press the PLAY button on this unit's remote control transmitter. Recording automatically begins. (For details, refer to page 23.) 19
-
 1
1 -
2
-
3
-
4
-
5
-
6
-
7
-
8
-
9
-
10
-
11
-
12
-
13
-
 14
14 -
 15
15 -
 16
16 -
 17
17 -
 18
18 -
 19
19 -
 20
20 -
 21
21 -
 22
22 -
 23
23 -
 24
24 -
25
-
26
 |
 |
