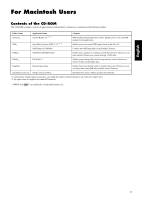
Yamaha CLP-150 Installation Guide - Page 11
File Utility, MIDI Setup - usb driver
 |
View all Yamaha CLP-150 manuals
Add to My Manuals
Save this manual to your list of manuals |
Page 11 highlights
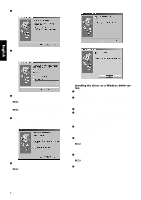
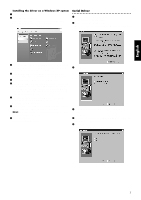
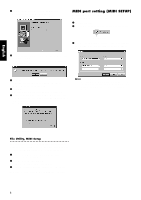
English 4 The "Install Location" box displays the destination of the installation. If you wish to change the destination disk or folder, use the [Switch Disk] button and the pop-up menu to specify the desired destination. n This box usually displays the start-up disk as the destination. 5 Click the [Install] button. The system displays the following message: "This installation requires your computer to restart after installing this software. Click Continue to automatically quit all other running applications." Click [Continue]. n To cancel the installation, click [Cancel]. 6 The installation starts. If the driver has already been installed, you will receive the following message. To return to step 3, press [Continue]. To complete the installation, click [Quit]. File Utility, MIDI Setup Once you've installed these software programs, you can use your computer to access and organize data stored to media connected to the Clavinova (Storage memory and (CLP-170 only) floppy disk). 1 Double-click on the "FileUtil_" folder in the CD-ROM. "Install File Utility" file will be displayed. 2 Double-click on the "Install File Utility" file. The File Utility installation dialog will be displayed. Execute the installation by following the on-screen directions. 3 After installing, restart the computer. For details, refer to the on-line Help or the PDF owner's manual. 7 When the installation is complete, the system displays the following message: "Installation was successful. You have installed software which requires you to restart your computer." Click [Restart]. The computer automatically restarts. You can locate the installed files in the following locations: • System Folder | Control Panels | YAMAHA USB MIDI Patch • System Folder | Extensions | USB YAMAHA MIDI Driver • System Folder | OMS Folder | YAMAHA USB MIDI OMS Driver 11
-
 1
1 -
2
-
3
-
4
-
5
-
 6
6 -
 7
7 -
 8
8 -
 9
9 -
 10
10 -
 11
11 -
 12
12 -
 13
13 -
 14
14 -
 15
15 -
 16
16 -
17
-
18
-
19
-
20
 |
 |
