Yamaha CVP-405 Owner's Manual - Page 78
Backup procedure, Song, Style, Registration Memory Bank, and Voice Data, Music Finder Record, Effect
 |
View all Yamaha CVP-405 manuals
Add to My Manuals
Save this manual to your list of manuals |
Page 78 highlights
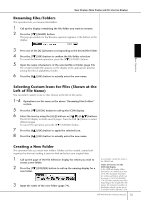
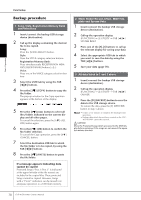
Basic Operation Data Backup Backup procedure 1 Song, Style, Registration Memory Bank and Voice Data 1 Insert/connect the backup USB storage device (destination). 2 Call up the display containing the desired file to be copied. Song: Press the [SONG SELECT] button. Style: Press the STYLE category selection buttons. Registration Memory Bank: Press simultaneously REGISTRATION MEMORY [REGIST BANK] buttons [+][-]. Voice: Press one of the VOICE category selection buttons. 3 Select the USER tab by using the TAB [√][®] buttons. 4 Press the [3†] (COPY) button to copy the file/folder. The pop-up window for the Copy operation appears at the bottom of the display. 5 Press the [6†] (ALL) button to select all files/folders indicated on the current display and all other pages. To cancel the selection, press the [6†] (ALL OFF) button again. 6 Press the [7†] (OK) button to confirm the file/folder selection. To cancel the Copy operation, press the [8†] (CANCEL) button. 7 Select the destination USB tab to which the file/folder is to be copied, by using the TAB [√][®] buttons. 8 Press the [4†] (PASTE) button to paste the file/folder. If a message appears indicating data cannot be copied Protected Songs ("Prot. 1/Prot.2" is indicated at the upper left side of the file names) are included in the copied files. These protected Songs cannot be copied. However, Songs with a "Prot.2" indication can be moved (cutand-paste operation) to a USB flash memory. 2 Music Finder Record, Effect, MIDI Template and System Data 1 Insert/connect the backup USB storage device (destination). 2 Call up the operation display. [FUNCTION] → [J] UTILITY → TAB [√][®] SYSTEM RESET 3 Press one of the [F]-[I] buttons to call up the relevant display for saving your data. 4 Select the appropriate USB tab to which you want to save the data by using the TAB [√][®] buttons. 5 Save your data (page 70). 3 All data listed in 1 and 2 above 1 Insert/connect the backup USB storage device (destination). 2 Call up the operation display. [FUNCTION] → [J] UTILITY → TAB [√][®] OWNER 3 Press the [D] (BACKUP) button to save the data to the USB storage device. To restore the data, press the [E] (RESTORE) button in step 3 above. n • It takes a few minutes to complete the backup/restore operation. • Backup data which has not been created on the CVP405/403/401 cannot be restored. CAUTION Move the Protected Songs which are saved to the USER display before restoring. If the songs are not moved, the operation deletes the data. 78 CVP-405/403/401 Owner's Manual
-
 1
1 -
2
-
3
-
4
-
5
-
6
-
7
-
8
-
9
-
10
-
11
-
12
-
13
-
14
-
15
-
16
-
17
-
18
-
19
-
20
-
21
-
22
-
23
-
24
-
25
-
26
-
27
-
28
-
29
-
30
-
31
-
32
-
33
-
34
-
35
-
36
-
37
-
38
-
39
-
40
-
41
-
42
-
43
-
44
-
45
-
46
-
47
-
48
-
49
-
50
-
51
-
52
-
53
-
54
-
55
-
56
-
57
-
58
-
59
-
60
-
61
-
62
-
63
-
64
-
65
-
66
-
67
-
68
-
69
-
70
-
71
-
72
-
 73
73 -
 74
74 -
 75
75 -
 76
76 -
 77
77 -
 78
78 -
 79
79 -
 80
80 -
 81
81 -
 82
82 -
 83
83 -
84
-
85
-
86
-
87
-
88
-
89
-
90
-
91
-
92
-
93
-
94
-
95
-
96
-
97
-
98
-
99
-
100
-
101
-
102
-
103
-
104
-
105
-
106
-
107
-
108
-
109
-
110
-
111
-
112
-
113
-
114
-
115
-
116
-
117
-
118
-
119
-
120
-
121
-
122
-
123
-
124
-
125
-
126
-
127
-
128
-
129
-
130
-
131
-
132
-
133
-
134
-
135
-
136
-
137
-
138
-
139
-
140
-
141
-
142
-
143
-
144
-
145
-
146
-
147
-
148
-
149
-
150
-
151
-
152
-
153
-
154
-
155
-
156
-
157
-
158
-
159
-
160
-
161
-
162
-
163
-
164
-
165
-
166
-
167
-
168
-
169
-
170
-
171
-
172
-
173
-
174
-
175
-
176
-
177
-
178
-
179
-
180
-
181
-
182
-
183
-
184
-
185
-
186
-
187
-
188
-
189
-
190
-
191
-
192
-
193
-
194
-
195
-
196
-
197
-
198
-
199
-
200
-
201
-
202
-
203
-
204
-
205
-
206
-
207
-
208
-
209
-
210
-
211
-
212
-
213
-
214
-
215
-
216
-
217
-
218
-
219
-
220
-
221
-
222
-
223
-
224
-
225
-
226
 |
 |