Yamaha CVP-59S Owner's Manual - Page 151
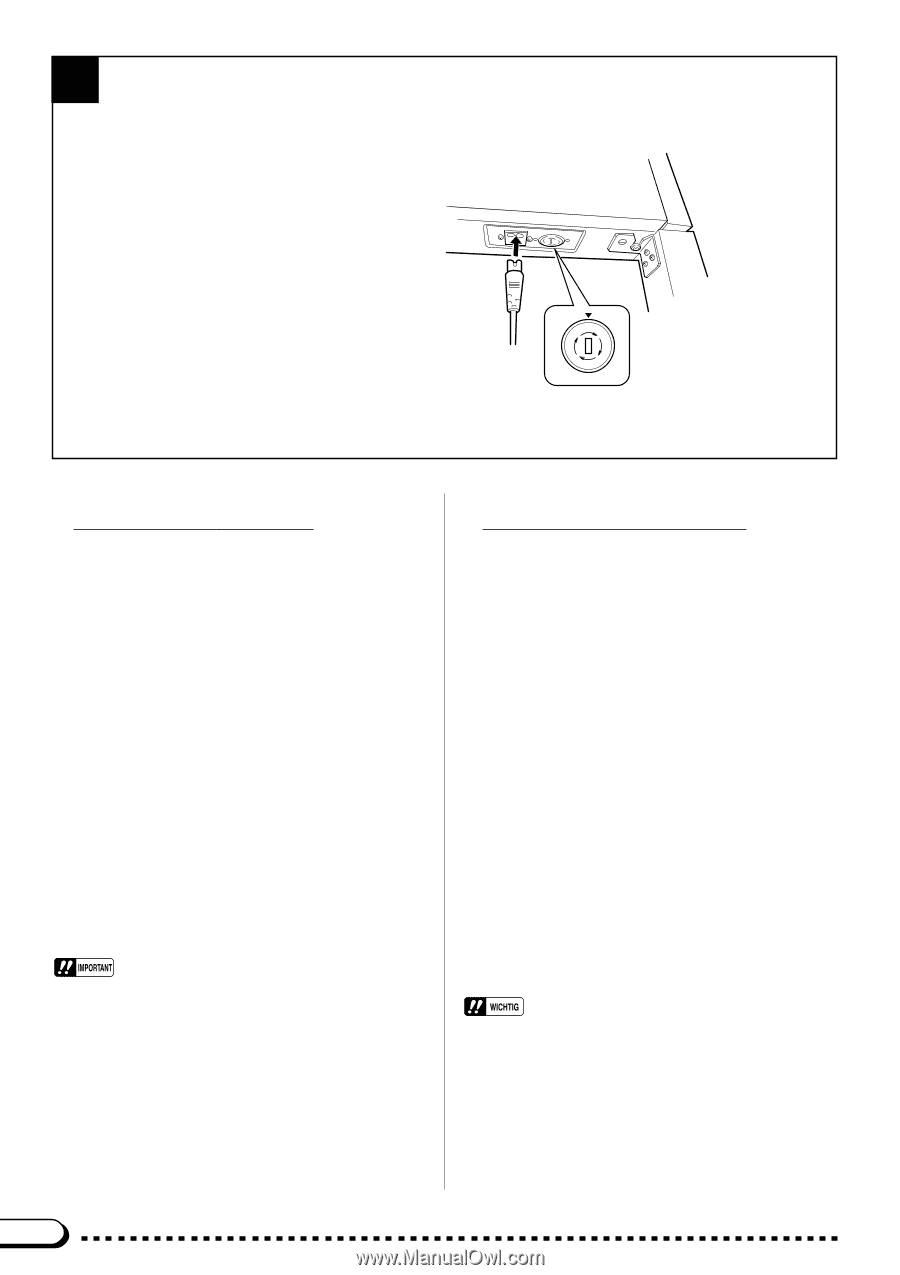
Netzspannung einstellen. Zum Verstellen drehen Sie
 |
View all Yamaha CVP-59S manuals
Add to My Manuals
Save this manual to your list of manuals |
Page 151 highlights
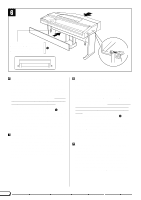
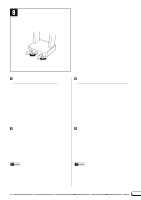
8 q A voltage selector is provided in some areas. q Spannungswähler (nur in bestimmten Verkaufsgebieten) q Un sélecteur de tension est prévu pour certaines régions q El selector de tensión está provisto para ciertos destinos. 127 240 220 110 Be sure to set the pedal adjusters. For stability, two adjusters are provided on the bottom of the pedal assembly (E). Rotate the adjusters until they comes in firm contact with the floor surface. The adjusters ensure stable pedal operation and facilitate pedal effect control. If the adjusters are not in firm contact with the floor surface, distorted sound may result. • After assembling the Clavinova, check once more to make sure that all screws have been securely fastened. • If the stand leans to the side, makes unusual noises, or otherwise seems unstable during use, check and tighten all screws while following the assembly instructions given above. Die Pedalstützen einstellen. Für bessere Standfestigkeit sind unter dem Pedalkasten (E) zwei verstellbare Pedalstützen vorgesehen. Nachdem Sie das Clavinova an seinem festen Standplatz aufgestellt haben, drehen Sie diese Stützen heraus, bis sie fest auf dem Boden stehen. Die Stützen sorgen beim Spielen für präzise Pedalbetätigung. Wenn die beiden Pedalstützen nicht fest auf dem Boden aufstehen, können Klangverzerrungen auftreten. • Vergewissern Sie sich nach Zusammenbau und Aufstellung des Clavinova noch einmal davon, daß alle Schrauben fest angezogen sind. • Wenn das Instrument schief steht, komische Geräusche erzeugt oder sich beim Spielen wackelig anfühlt, prüfen Sie gemäß den obigen Anweisungen, ob das Instrument richtig zusammengebaut wurde, und ziehen dabei die einzelnen Schrauben noch einmal nach. 148
-
 1
1 -
2
-
3
-
4
-
5
-
6
-
7
-
8
-
9
-
10
-
11
-
12
-
13
-
14
-
15
-
16
-
17
-
18
-
19
-
20
-
21
-
22
-
23
-
24
-
25
-
26
-
27
-
28
-
29
-
30
-
31
-
32
-
33
-
34
-
35
-
36
-
37
-
38
-
39
-
40
-
41
-
42
-
43
-
44
-
45
-
46
-
47
-
48
-
49
-
50
-
51
-
52
-
53
-
54
-
55
-
56
-
57
-
58
-
59
-
60
-
61
-
62
-
63
-
64
-
65
-
66
-
67
-
68
-
69
-
70
-
71
-
72
-
73
-
74
-
75
-
76
-
77
-
78
-
79
-
80
-
81
-
82
-
83
-
84
-
85
-
86
-
87
-
88
-
89
-
90
-
91
-
92
-
93
-
94
-
95
-
96
-
97
-
98
-
99
-
100
-
101
-
102
-
103
-
104
-
105
-
106
-
107
-
108
-
109
-
110
-
111
-
112
-
113
-
114
-
115
-
116
-
117
-
118
-
119
-
120
-
121
-
122
-
123
-
124
-
125
-
126
-
127
-
128
-
129
-
130
-
131
-
132
-
133
-
134
-
135
-
136
-
137
-
138
-
139
-
140
-
141
-
142
-
143
-
144
-
145
-
 146
146 -
 147
147 -
 148
148 -
 149
149 -
 150
150 -
 151
151 -
 152
152 -
 153
153 -
 154
154 -
 155
155 -
 156
156 -
157
-
158
-
159
-
160
-
161
-
162
-
163
 |
 |