Yamaha CVP-59S Owner's Manual - Page 6
Preparation - clavinova piano
 |
View all Yamaha CVP-59S manuals
Add to My Manuals
Save this manual to your list of manuals |
Page 6 highlights
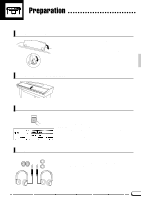
Preparation The Music Stand If you will be using sheet music with your Clavinova, raise the music stand built into it's top panel by lifting the rear edge of the music stand. Flip down the braces on either side of the rear of the music stand so that they catch inside the protrusions on the top panel. Reverse this operation o lower the stand. The Key Cover (CVP-79A/69/69A) CVP-79A The Power Switch To open the CVP-79A/69/69A key cover lift it just enough to clear the keys (do not lift excessively) then slide the cover back into the main unit. To close the cover slide it forward all the way and then lower it gently until it closes completely. POWER After making sure that the Clavinova's AC cord is properly plugged into the Clavinova itself and plugged into a convenient AC wall outlet (a power-plug adaptor may be provided in some areas), press the [POWER] switch located to the left of the keyboard once to turn the power on. Press the [POWER] switch again to turn the power off. When the power is initially turned on, the PIANO voice selector indicator will light, the POP style selector indicator will light, and the display will appear as shown to the left. Headphones CVP-79A PHONES CVP-69/69A/59S One or two standard pairs of stereo headphones can be plugged in here for private practice or late-night playing. The internal speaker system is automatically shut off when a pair of headphones is plugged into either or both of the PHONES jacks. 3
-
 1
1 -
 2
2 -
 3
3 -
 4
4 -
 5
5 -
 6
6 -
 7
7 -
 8
8 -
 9
9 -
 10
10 -
 11
11 -
 12
12 -
13
-
14
-
15
-
16
-
17
-
18
-
19
-
20
-
21
-
22
-
23
-
24
-
25
-
26
-
27
-
28
-
29
-
30
-
31
-
32
-
33
-
34
-
35
-
36
-
37
-
38
-
39
-
40
-
41
-
42
-
43
-
44
-
45
-
46
-
47
-
48
-
49
-
50
-
51
-
52
-
53
-
54
-
55
-
56
-
57
-
58
-
59
-
60
-
61
-
62
-
63
-
64
-
65
-
66
-
67
-
68
-
69
-
70
-
71
-
72
-
73
-
74
-
75
-
76
-
77
-
78
-
79
-
80
-
81
-
82
-
83
-
84
-
85
-
86
-
87
-
88
-
89
-
90
-
91
-
92
-
93
-
94
-
95
-
96
-
97
-
98
-
99
-
100
-
101
-
102
-
103
-
104
-
105
-
106
-
107
-
108
-
109
-
110
-
111
-
112
-
113
-
114
-
115
-
116
-
117
-
118
-
119
-
120
-
121
-
122
-
123
-
124
-
125
-
126
-
127
-
128
-
129
-
130
-
131
-
132
-
133
-
134
-
135
-
136
-
137
-
138
-
139
-
140
-
141
-
142
-
143
-
144
-
145
-
146
-
147
-
148
-
149
-
150
-
151
-
152
-
153
-
154
-
155
-
156
-
157
-
158
-
159
-
160
-
161
-
162
-
163
 |
 |
