Yamaha Cornets Owner's Manual - Page 6
Before You Play - trumpets
 |
View all Yamaha Cornets manuals
Add to My Manuals
Save this manual to your list of manuals |
Page 6 highlights
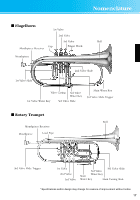
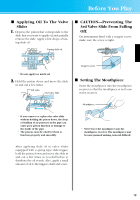
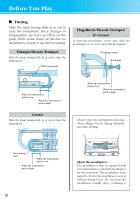
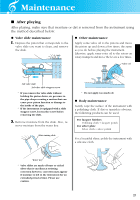
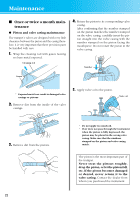
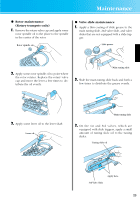
Before You Play Handling the Instrument As the trumpet is made of thin metal, handle the instrument carefully. Do not apply any excessive force, or bump the instrument so as to dent or damage it. ■ Applying Oil Apply oil to the pistons 1. Unscrew the valve cap and pull the piston straight out of the valve casing until about half of the valve piston is exposed. 2. Apply a few drops of valve oil on the pis- ton. Valve oil Piston * Do not apply too much oil. 3. Slowly, return the piston into the valve cas- ing. At this time, make sure the number stamped on the piston is facing the mouthpiece. After the valve cap is tightened firmly, move the piston up and down a few times to distribute the oil over the piston evenly. Number * If all pistons have been removed from the valve casings, make sure the number stamped on the piston matches the number stamped on the casing before returning the piston into the valve casing. * The pistons must be oiled for them to function properly and smoothly. 18 Applying Oil To The Rotors (Rotary Trumpets Only) 1. Hold the lever down and remove the valve slide. * If the valve slide is removed without holding the lever down, air pressure in the pipe drops creating a suction that can cause poor rotor function or damage to the inside of the pipe. 2. Apply some rotor oil to the rotor and then move the lever a few times to distribute the oil evenly. Rotor oil * To keep oil from mixing with the slide grease or dirt inside of the pipe, hold the oil container's spout so that is does not come into contact with the inner walls of the pipe. * Since the oil container's spout is metallic, be careful not to let the spout come into direct contact with the rotor. 3. Hold the lever down and replace the valve slide. * If you replace the valve slide without holding the lever down, pressure built up inside the pipe can cause poor rotor function or damage to the inside of the pipe.
-
 1
1 -
 2
2 -
 3
3 -
 4
4 -
 5
5 -
 6
6 -
 7
7 -
 8
8 -
 9
9 -
 10
10 -
 11
11 -
 12
12 -
13
-
14
-
15
-
16
 |
 |
