Yamaha DD-75 DD-75 Owners Manual - Page 13
Connecting Pedals 1 and 2, Turning the Power On/Off, Setting the Battery Type, Standby/On switch - drum pad
 |
View all Yamaha DD-75 manuals
Add to My Manuals
Save this manual to your list of manuals |
Page 13 highlights
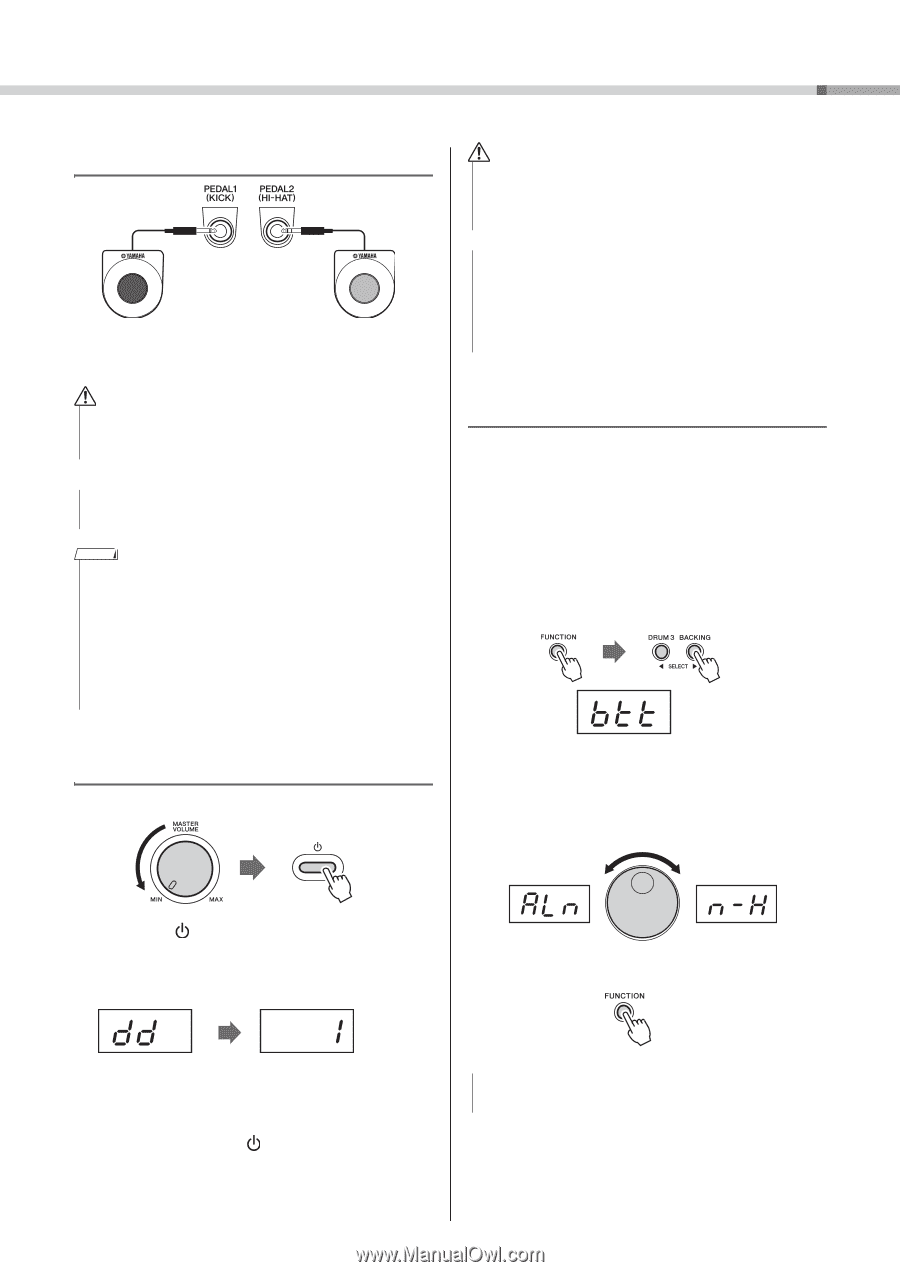
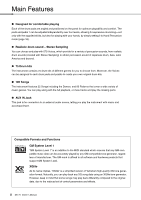
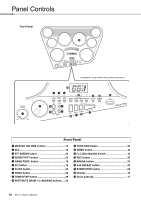
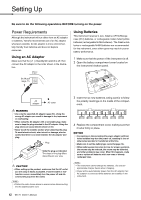
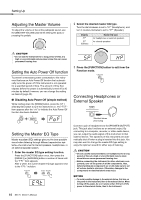
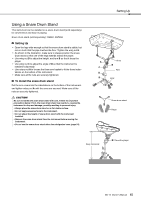
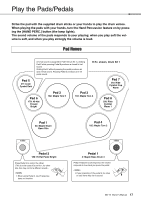
Setting Up Connecting Pedals 1 and 2 Pedal 1 Pedal 2 Connect the supplied Pedal 1 to the [PEDAL 1 (KICK)] jack and Pedal 2 to the [PEDAL 2 (HI-HAT)] jack. CAUTION • Avoid getting caught in or tripping over the pedal cords; this may cause the instrument to fall and result in damage or injury. NOTICE • Avoid using the pedals directly on a soft floor, since they may scratch the surface of the floor. NOTE • Make sure that the pedal plugs are properly connected to the PEDAL jacks before turning on the power. • Do not press the pedals while turning the power on. Doing this changes the recognized polarity of the pedal, resulting in reversed pedal operation. • You can use an Electronic drum pad KP65 (sold separately) or an Electronic kick unit KU100 (sold separately) and hi-hat controller HH65 or HH40 (sold separately) plugging into the [PEDAL 1 (KICK)] jack and [PEDAL 2(HI-HAT)]. CAUTION • Even when the power switch is turned off, electricity is still flowing to the product at the minimum level. When you are not using the product for a long time, make sure to unplug the power cord from the wall AC outlet. NOTICE • Do not attempt any other operations, such as pressing buttons or the pedal. Doing so may cause the instrument to malfunction. • Do not turn off the power while saving data (a "-" mark appears and moves from left to right on the display). Doing so can result in loss of data. Setting the Battery Type Depending on the battery type to be used, you may need to change the battery type setting on this instrument. To change the setting, first turn on the power to the instrument, then choose the battery type you would like to use. Alkaline (and manganese) batteries are chosen by default. 1 Press the [FUNCTION] button. Press the [DRUM 3] or [FUNCTION] button a number of times until the "btt" item appears. The currently selected battery type appears next to the "btt" indication. Turning the Power On/Off 1 Turn down the [MASTER VOLUME] dial to "MIN." 2 Change the battery type by turning the dial. To select Ni-MH, turn the dial to the right (clockwise) until the "n-H" item appears, and to select Alkaline/ Manganese, turn the dial to the left (counter-clockwise) until the "ALn" item appears. 2 Press the [ ] (Standby/On) switch to turn the power on. The display lights up. Adjust the volume as desired while striking the pads. 3 Press the [FUNCTION] button to exit. When the power is turned on, Drum Kit number will appear after the "dd" item appears. Drum Kit number "1" is normally selected. 3 Press and hold the [ ] (Standby/On) switch for about a second to turn the power off. NOTICE • Failure to set the appropriate battery type may shorten the battery life. Make sure to set the battery type correctly. DD-75 Owner's Manual 13
-
 1
1 -
2
-
3
-
4
-
5
-
6
-
7
-
 8
8 -
 9
9 -
 10
10 -
 11
11 -
 12
12 -
 13
13 -
 14
14 -
 15
15 -
 16
16 -
 17
17 -
 18
18 -
19
-
20
-
21
-
22
-
23
-
24
-
25
-
26
-
27
-
28
-
29
-
30
-
31
-
32
-
33
-
34
-
35
-
36
-
37
-
38
-
39
-
40
-
41
-
42
-
43
-
44
-
45
-
46
-
47
-
48
-
49
-
50
-
51
-
52
-
53
-
54
-
55
-
56
-
57
-
58
-
59
-
60
 |
 |